Testing the integration sandbox with Fluxygen
November 16, 2025
Intro
Recently I wrote about the integration sandbox I built that enables me to test and evaluate an integration use case in the transport and logistics domain without actually having to deal with setting up real systems. With the sandbox ready, I want to see how it works with a platform I know well: Fluxygen. I've used it professionally for e-commerce, finance, transport and logistics, and manufacturing projects.
Fluxygen is an opinionated, low-code Integration platform as a service (iPaaS). Opinionated means they abstract a lot of the technical details away. It's designed for organisations looking to develop integrations through an intuitive UI without writing code. This enables tech-savvy domain experts to build integrations themselves and lets organisations focus on the business logic that makes their processes special. Having worked with the platform for multiple years, I can definitely say that they deliver on usability.
At the same time, integration architecture still requires thinking through data flows, error handling, and business logic. The platform gives you the tools, but doesn't do the thinking for you.
Under the hood, Fluxygen is built on Apache Camel, the open source integration framework that implements the Enterprise Integration Patterns. Fluxygen uses these patterns throughout their UI and therefore naturally teaches you a universal integration vocabulary.
Let's see how it all comes together in Fluxygen!
Processes walkthrough
There are two processes in the sandbox that I want to integrate:
- TMS shipment to Broker order
- Broker event to TMS event
As mentioned in the docs, the APIs are secured. We'll handle this globally for both the processes. Let's have a look at an overview of the processes that we're going to integrate:
Authentication
The sandbox's APIs are secured by Simple OAuth2 with Password and Bearer authentication that provides a JWT (JSON Web Token). These tokens expire every 15 minutes, so we'll need to create a process that refreshes these tokens automatically and enables the other processes to run without manual intervention.
flowchart TD
A@{ shape: circle, label: "start \n(every 10min)" } --> B
B@{ shape: rect, label: "get token" } --> C
C@{shape: diam, label: "success?"}
		C --> |Yes| D
		C --> |No| E@{shape: rect, label: "handle errors"}
D@{shape: rect, label: "Save JWT"} --> F
F@{shape: framed-circle, label: "end"}
- Scheduler starts the process
- Get a new token from the /token endpoint
- Check the result
- Save JWT or handle the unexpected result
TMS shipment to Broker order
The TMS shipments will be pulled periodically from the TMS API and then transformed and delivered to the Broker API.
flowchart TD
A@{ shape: circle, label: "start" } --> B
B@{ shape: rect, label: "get new shipments" } --> C0
C0@{shape: diam, label: "any \nshipments?"}
		C0 --> |Yes| C
		C0 --> |No| C2@{shape: framed-circle, label: "end"}
subgraph for each shipment
	C@{shape: lean-r, label: "transform to order"} --> D
	D@{shape: rect, label: "post order"} --> E
	E@{shape: rect, label: "log result"}
end
E --> F@{shape: diam, label: "success?"}
		F --> |Yes| G@{shape: framed-circle, label: "end"}
		F --> |No| H@{shape: rect, label: "handle errors"}
- Scheduler starts the process
- Get new shipments from the /tms/shipments endpoint
- Check for shipments in response
- Split shipments payload into a sequence of single shipments (for each)
- Perform a data mapping to the broker format
- Create the order with the /broker/order endpoint
- Log the result
- Check the aggregated results for errors and handle if necessary.
Broker event to TMS event
The broker events are sent to a webhook which will transform and deliver them to the TMS API:
flowchart TD
A@{ shape: circle, label: "start" } --> B
B@{ shape: rect, label: "check api key" } --> C
C@{shape: diam, label: "valid?"}
		C --> |Yes| D
		C --> |No| E@{shape: rect, label: "return HTTP 401"}
D@{shape: lean-r, label: "transform to tms event"} --> F
F@{shape: rect, label: "post event"} --> G
G@{shape: diam, label: "success?"}
		G --> |Yes| H@{shape: framed-circle, label: "End"}
		G --> |No| I@{shape: rect, label: "handle errors"}
- Inbound HTTP message starts the process
- The incoming webhook API token is validated.
X-API-KEY - Perform a data mapping to the tms format
- Create the event with the tms/event/shipment_id endpoint
- Log the result
Integrating with Fluxygen
Now that we have laid our groundwork we can actually start integrating. If you want to follow along, you will first have to reach out to Fluxygen for a demo account.
A quick overview
I'm not going to describe all the features in detail here. I think that Fluxygen's academy provides loads of detailed info. And there's also Luke Saunders's video of Dovetail (the former name of Fluxygen) which describes the basics excellently.
Nevertheless, I'd still like to explain some core concepts to give some context. Primarily there are 4 screens that users can work with:
-
Flow manager - Provides high level information of all the flows and lets you view detailed information, such as installation time, errors, successful executions, tracing and logs per flow.
-
Flow designer - The place where flows are created.
-
Tenant manager - Lets admins manage users and global settings.
-
Tenant variables - Create, update and delete global variables.
Click to open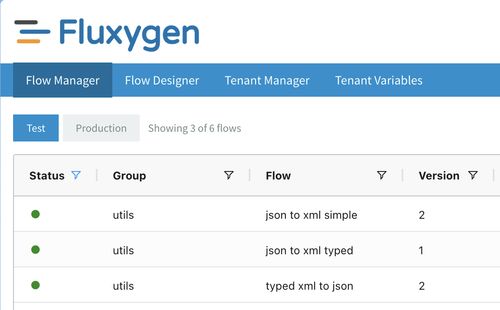

Integrations in Fluxygen enable messages to flow from point A to point B. This is done by creating flows where users can manage the flow of messages and how they are processed. Processing is orchestrated by adding the right components in the right order.
Messages have the following structure (just like HTTP messages):
- Headers - Contains metadata / header data of the message;
- Body - Contains the entire message (string or binary). The destination of a message is dependent on the next component in the flow or the settings of the component.
There are 4 types of variables in Fluxygen:
- On the message level there are message headers. These are the dynamic variables within a flow. For example: if I want to store a result of an http call to a temporary variable, I would use the headers.
- Messages also have message properties. Message properties contain metadata about a message and are only for internal use. These cannot be set. For example BodySize, HeadersSize, timestamp.
- Flow properties are the static variables of a flow. I primarily use these for base URL's, folder paths, flow specific credentials that don't automatically rotate etc.
- Tenant variables. These can be seen as global variables. I primarily use these for storing credentials that are used by multiple flows.
Building the authentication flow
As mentioned earlier, the sandbox's APIs requires users to authenticate using OAuth. The type of OAuth is a simple password credentials grant that requires the user to send their username and password in a application/x-www-form-urlencoded HTTP POST to the API. If all goes well, the user will get a JWT access token that is valid for 15 minutes.
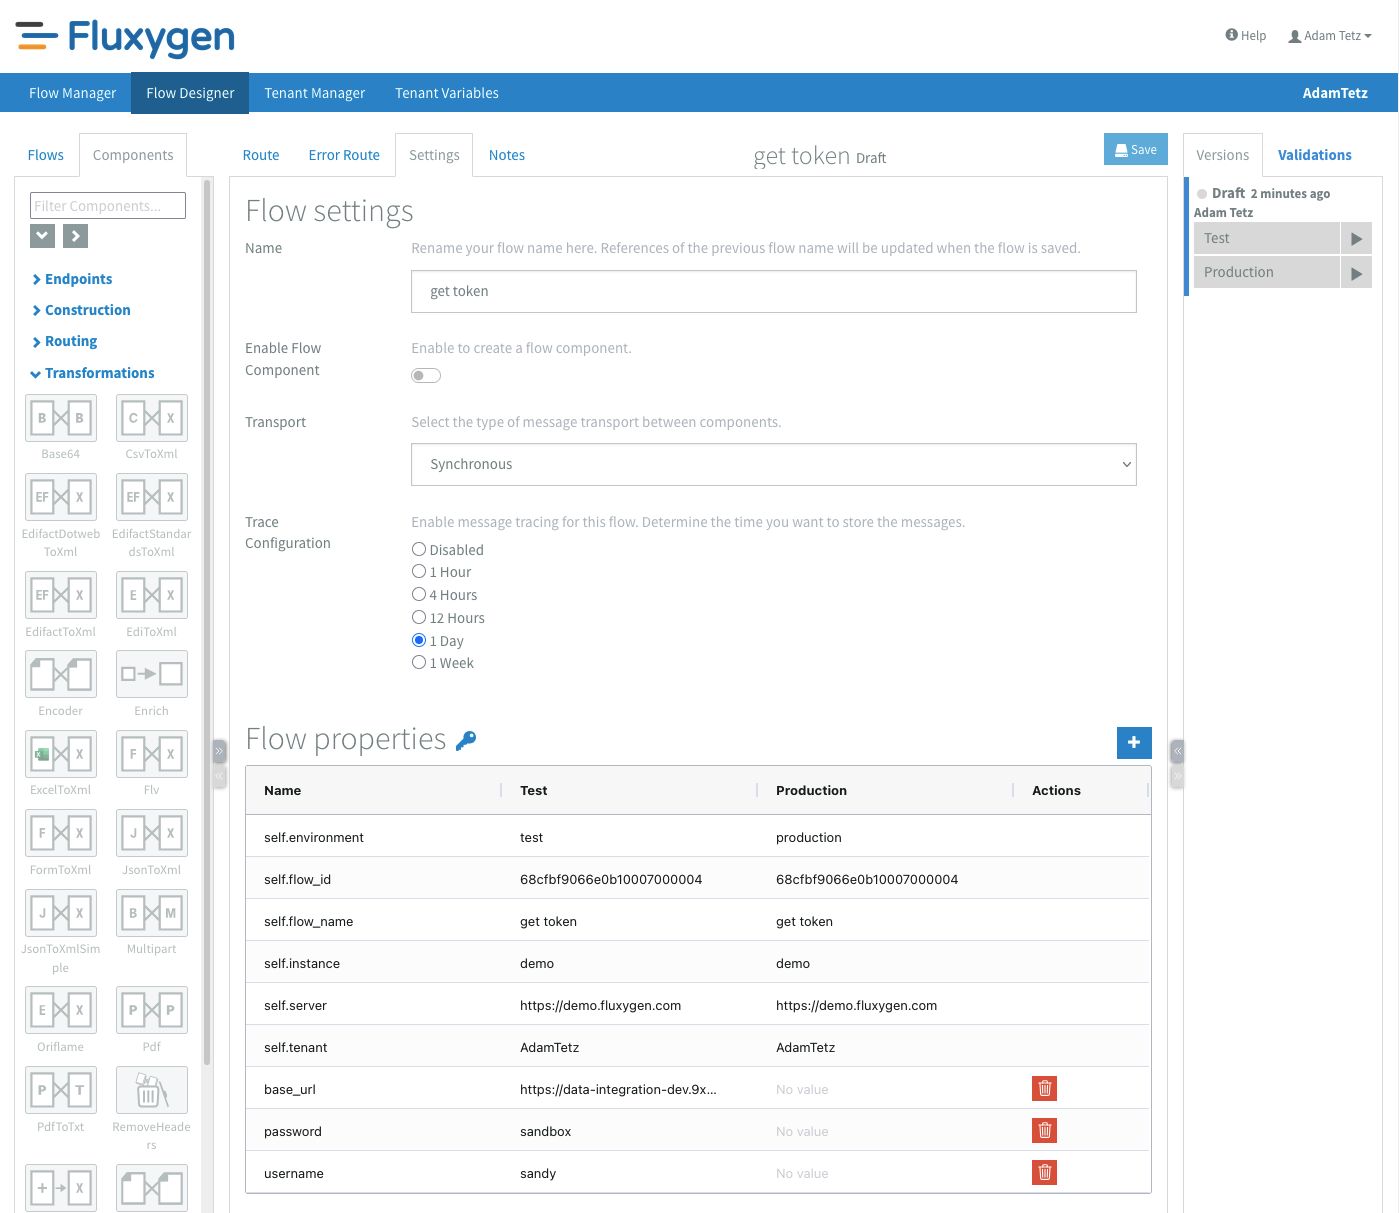
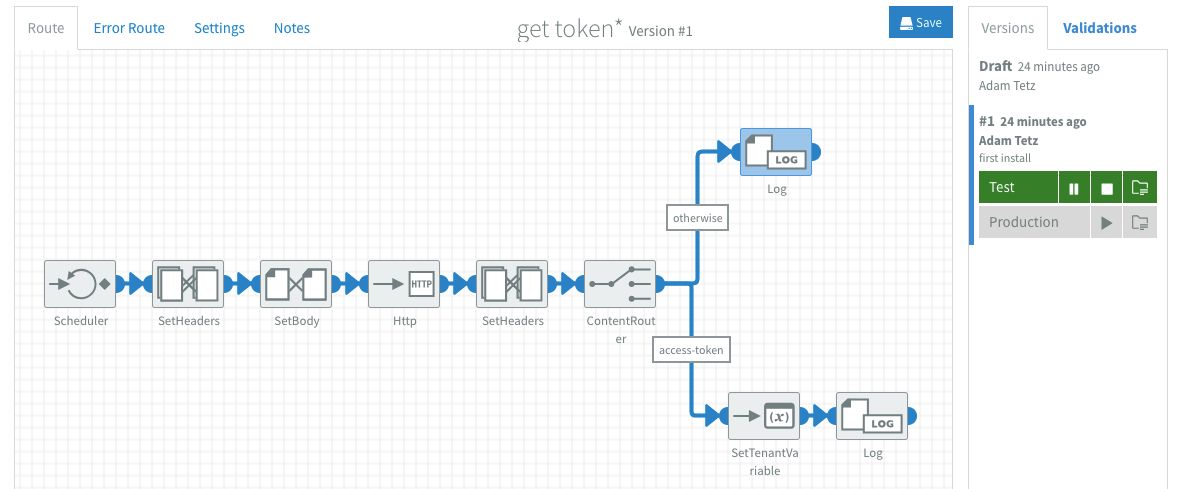
Since I want to use the access token from multiple flows, I created a new flow called "get token" that retrieves a new token and stores it in the tenant variables. Fluxygen lets you install test and production versions of your flows, and each environment can have their own set of flow properties. Because I wanted the API URL, username, and password to be configurable for different environments, I set them up as flow properties instead of hardcoding them. I also set the tracing of the flow to 1 day. This means that I can view a detailed log of the transactions and that this information is kept for 1 day.
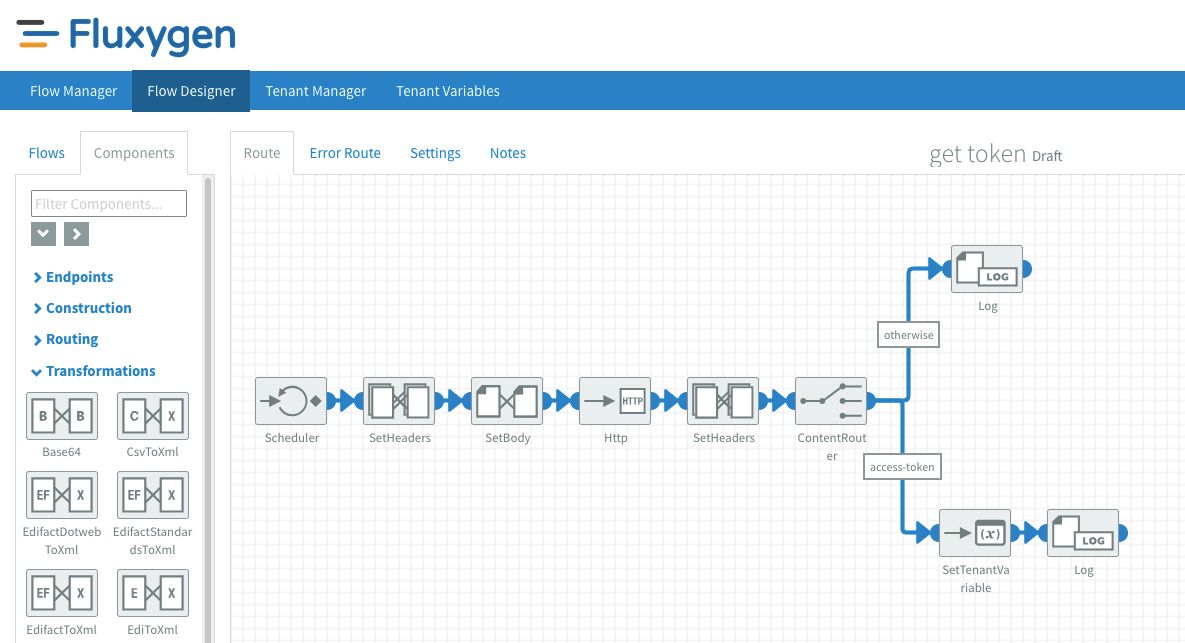
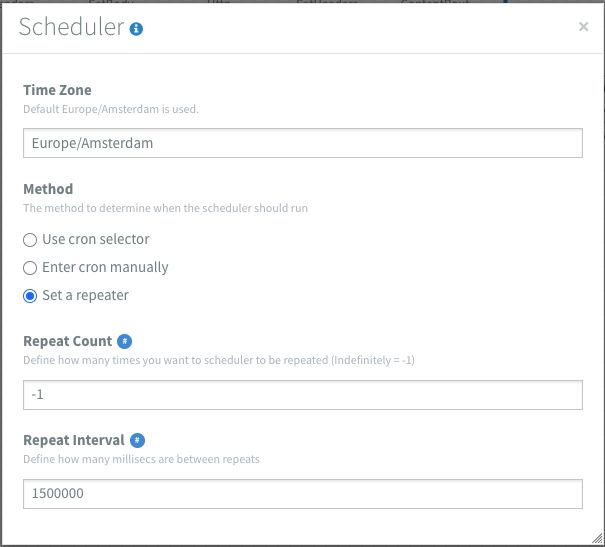
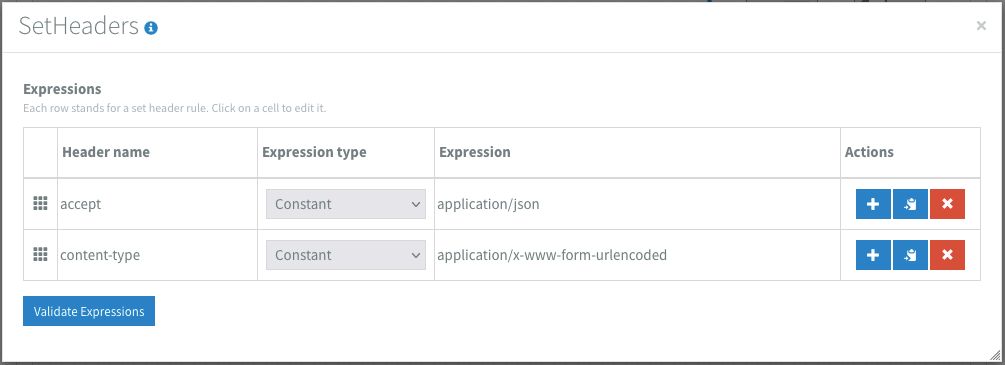
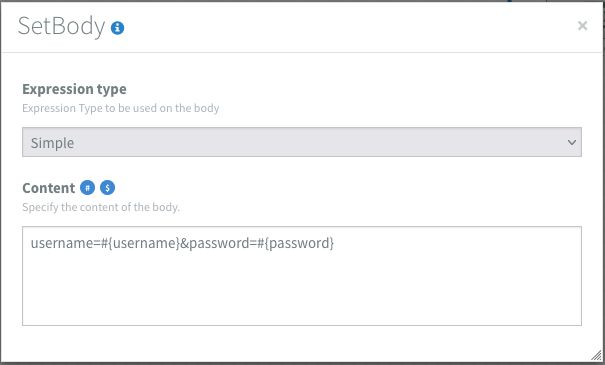
I chose to schedule the flow for 10 minutes since this will give me 5 minutes to fix any possible issues. After I set the Content-Type and Accept headers, I set the message body to: username=#{username}&password=#{password}. Where the #{variables} refer to the flow properties. These are added via the blue # sign. The body is then sent to the sandbox's token URL via a HTTP POST using the HTTP component. I enabled Use error route? which means that once the HTTP component returns a response code outside of the 200-300 range, It will trigger the error route.
If all goes well we should get an HTTP response code of 200 with a message body that looks like this:
{
"access_token": "eyJhbGciOiJIUzI1NiIsInR5cCI6IkpXVCJ9.eyJzdWIiOiJzYW5keSIsImV4cCI6MTc1ODQ1MDA1MX0.i3uSNpI84oPJoH7o72gopAuSgsxKCQvA36dj_dj6Nt0",
"token_type": "bearer"
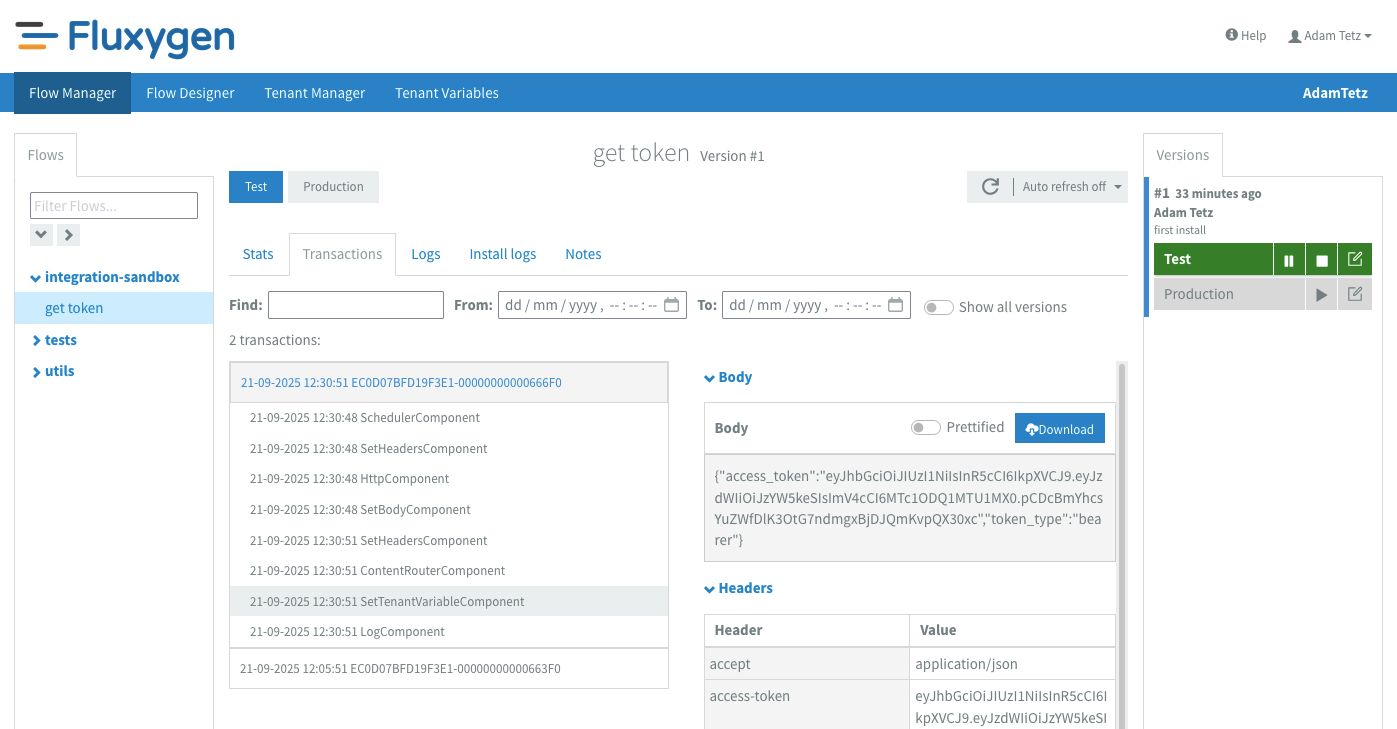
}At this point in the flow we know that we only get valid http response codes. access_token is the part we are interested in saving to the tenant variables, so I set this on a header using JsonPath. JsonPath lets you extract specific values from JSON responses. In this case I can get the access token with: $.access_token.
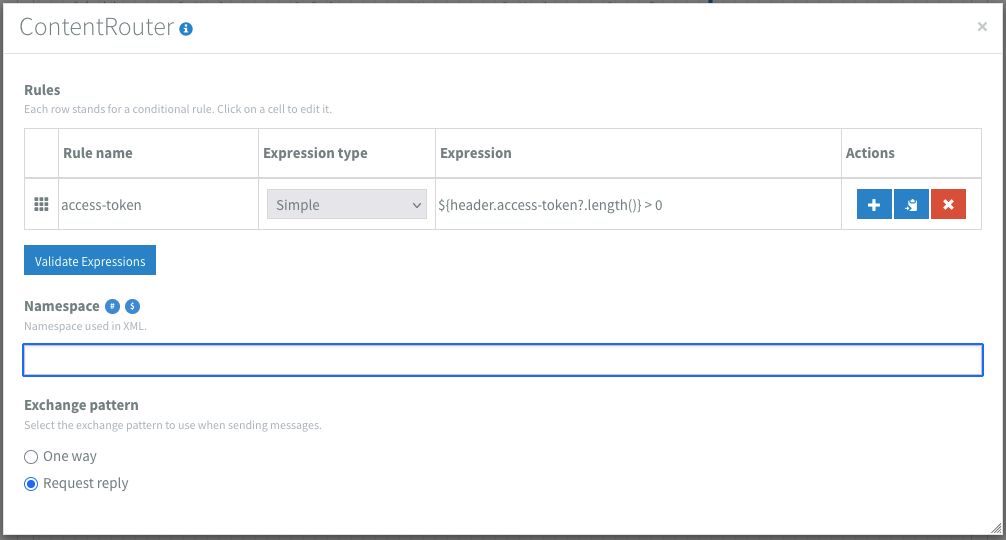
But sometimes a valid http status does not necessarily mean that the body is exactly how we want it to be. And I surely do not want to save an empty or invalid value to my variables. To catch these kind of differences I added a header to calculate the length of the token. This time using a simple expression: ${header.access-token?.length()}. Simple is a language shipped with Apache Camel that prevents scripting for simpler use cases.
Next I added a content router that checks if the length of the access-token-length header is greater than 0. If so, it will proceed and save the value to the tenant variables. Note in the images that I have added the Bearer to the variable. This makes it easier using the value further down the line directly on a Authorization header. If not, it stops at a log component. In my example this situation is not handled any further, but this route could for example send a notification or perform some custom handling according to what the business users want to know.

Installing and checking the authentication flow
From the flow designer the play icon on the right will let users install a flow in that environment immediately. Once started, the environment will colour green. To check if the flow runs as it should I can quickly navigate to the flow details via the folder icon next to the stop icon.
The flow details show the general stats first. Here we can see the status of the flow, general settings and how many exchanges were completed, pending or failed. The next tab that I use often is the transactions tab. On this tab it's easy to see how many times the flow has executed and also the exact inputs of every component in the flow. Pro tip: Since the tracing only shows the input a component, I like to end a branch of a flow with a log component so that I can see all relevant outputs in the tracing.
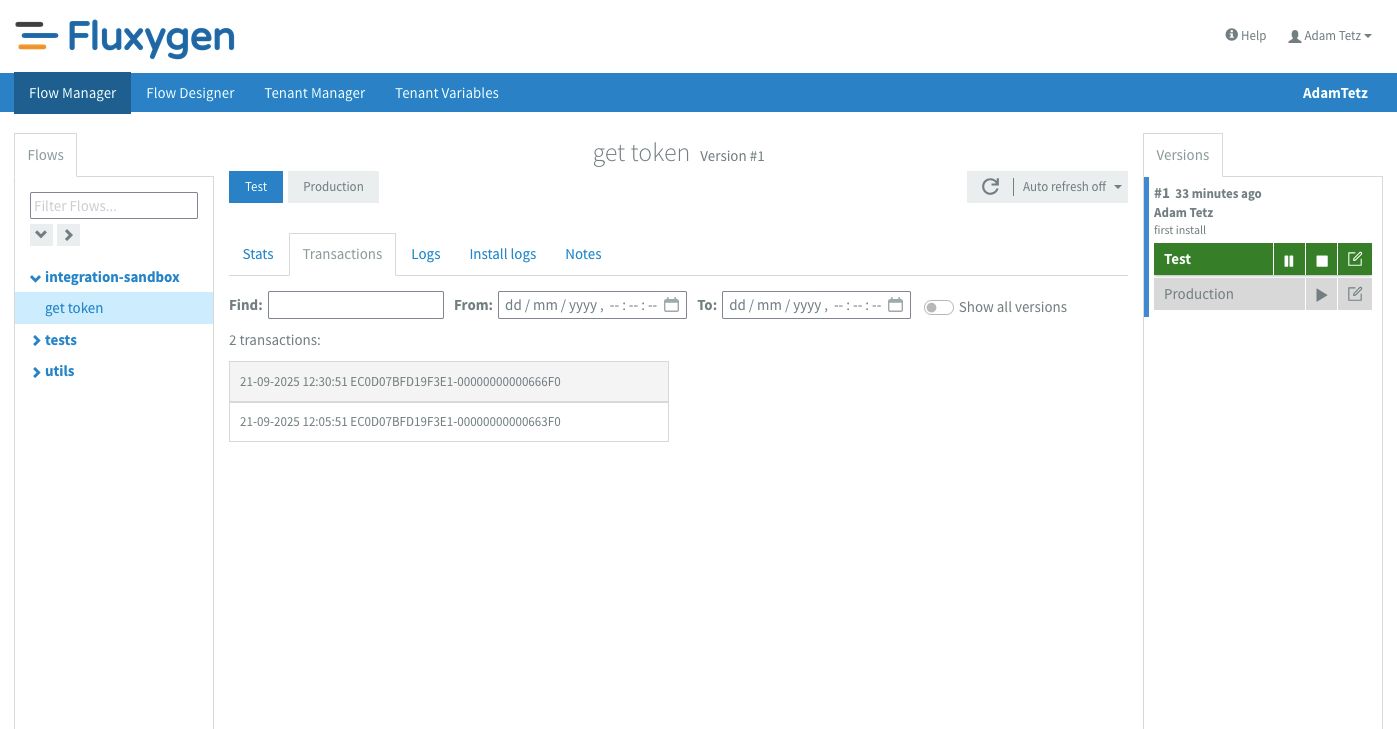
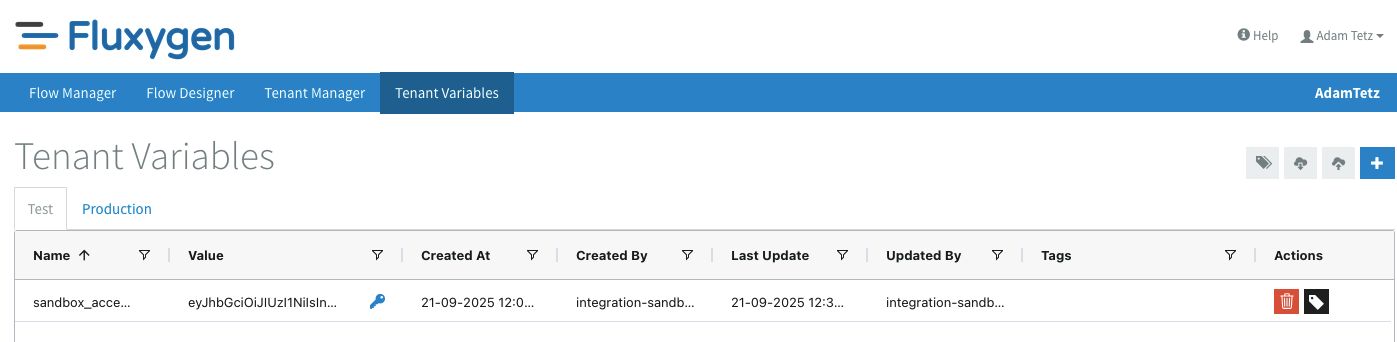
So far so good! There are no errors and every component seems to have processed how I wanted it to. Let's go to the tenant variables screen to check if the flow has saved the access token.
Perfect! Since auth is working, we can now start building the TMS shipment to Broker order flow.
Building the TMS shipment to Broker order flow
As mentioned earlier, we want to process new shipments on a schedule. But before we dive into creating the flow, we need to make sure that there are new shipments in the sandbox.
We can seed a number of shipments by sending an authenticated HTTP POST request to #{base_url}/api/v1/tms/shipments/seed with the following body:
{"count": 100}For tasks like these and creating proof of concepts in general, I like to use Postman as my HTTP client. If you're a Postman user then you're in luck, I have exported my collection for anyone to use. It uses a couple of environment variables and has a small utility script that stores the result of the /token call into the variables, which prevents me from copying and pasting the Bearer token every 15min.
I gave the flow a clear and descriptive name that matches the process: new tms shipment to broker order. For this process I don't have a real business requirement for the time schedule so I decided to go with 5 minutes. The scheduler will trigger the flow as soon as it is installed.
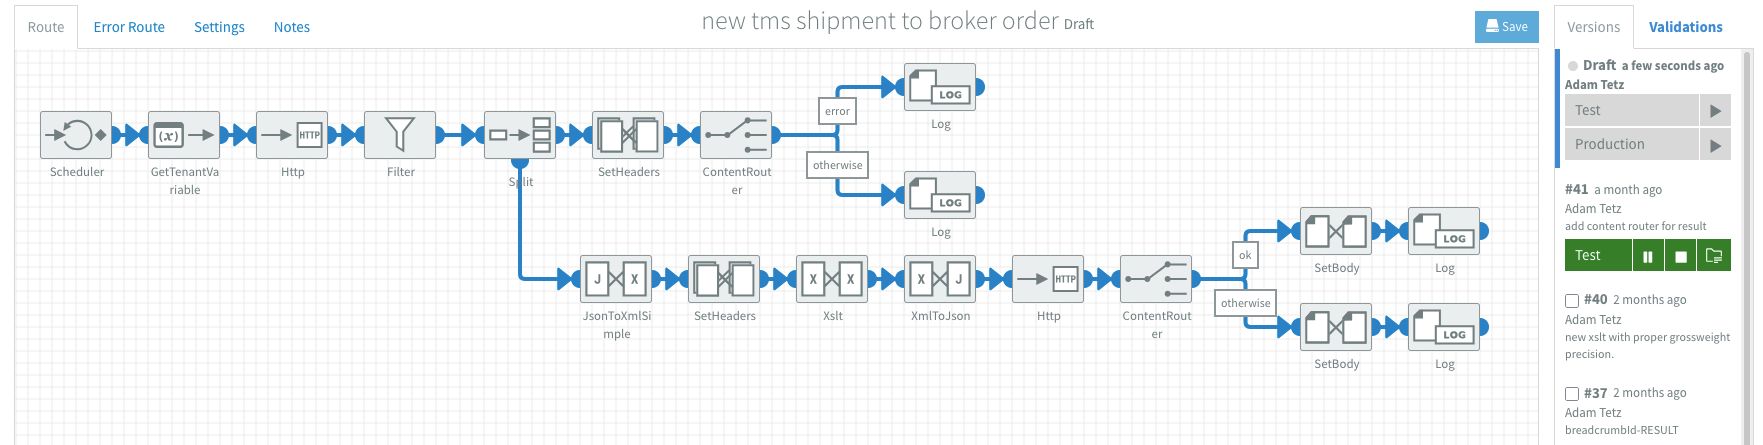
Over the development of an integration I will have created and tested many iterations in a short period of time. Preferably I install and test after adding each component and keep the feedback loop as short as possible. Fluxygen has built-in versioning and requires me to create a new version after any change. This makes it very easy to switch between versions and revert back if necessary. This is very useful for experimenting with expressions.
The first priority after the flow triggers is setting the correct credentials for the request. Since the authentication flow already stores the token, I only need to get the right tenant variable and set the value on a header named Authorization.
With the authentication in place, I perform a HTTP GET request to {base_url}/api/v1/tms/shipments/new?limit=10. I've added the limit=10 query parameter to have a nice small sample to work with.
Ideally the API returns a list of shipments, but there are cases where there aren't any new shipments to process. To stop the flow when there are no new shipments, I added a filter that checks if the response body isn't null: ${bodyAs(String)} != 'null'
Now I can trust that only a list of shipments is passing through the filter, I split the message to process each shipment separately. In this context a split works like a for each. I configured the split component with JsonPath $[*] and set the Aggregation to JSON.
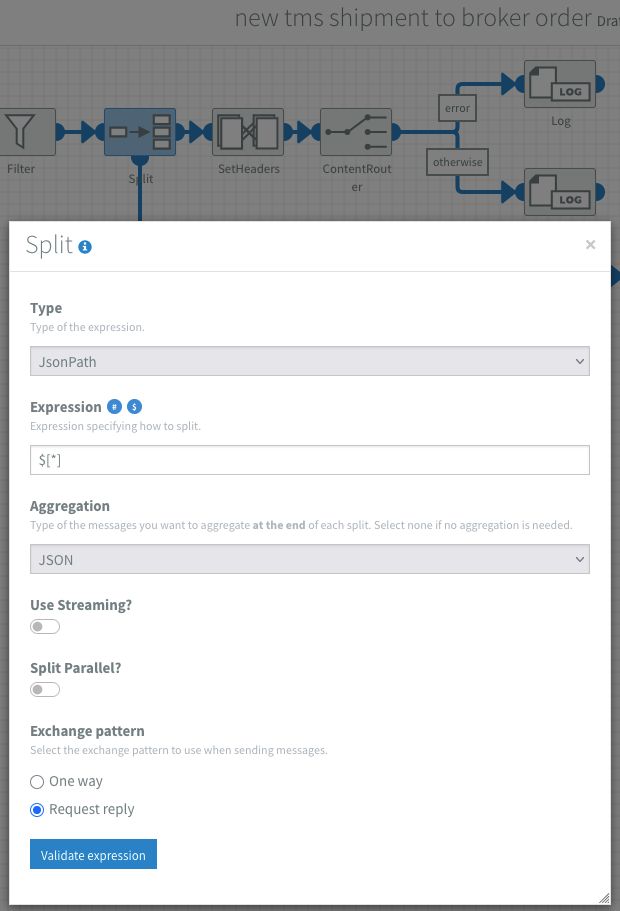
From that point on all of the components attached to the bottom part of the split component are executed as a sub-process for each shipment. The Aggregation setting enables me to collect the result of each sub-process. After all shipments have been processed, the aggregated result is sent back to the main process as output of the split component. I can later use this in the main process to check if there were any errors.
The sub-process transforms the shipment and sends it to the broker API. One of the things that Fluxygen unfortunately does not have is a built in data mapper. Fortunately there are multiple ways to perform a data mapping with some templating or scripting:
- XML files can be transformed with a XSLT
- Scripting with JavaScript or GroovyScript
- Templating with the Velocity templating engine
To stay in the low-code theme, Fluxygen recommends using Altova MapForce as a mapping tool. MapForce is a very powerful graphical data mapping tool that supports a wide range of data formats. In this case I'll use it to make an XSLT.
You might think: XSLT?! But we have been working with JSON! That's correct! In integration projects, the tool of choice often depends on who will maintain the mappings:
- Do we want business users to be able to modify mappings themselves (low-code)?
- Are we okay with all changes requiring developer involvement (code)? This means for this use case that we'll introduce some format conversion overhead for the sake of maintainability. And while this may introduce other challenges, I'll show how I deal with them to make them less painful.
For the XSLT setup, I first add a JsonToXMLSimple component. As the name states, this is a simple component that transforms a JSON body to XML. It has some quirks but in general I follow this rule:
- For one-way conversion (JSON→XML→XSLT), JsonToXMLSimple is fine
- For two-way-conversion (JSON→XML→JSON) a typed XML with JsonToXML is better.
Why? Click here for a detailed explanation!
Take for example the JsonToXMLSimple component with the following input:
{
    "id": 1,
    "name": "Example",
    "list": [
        "a",
        "b",
        "c"
    ]
}
This will result in:
<?xml version="1.0" encoding="UTF-8"?>
<root>
    <name>Example</name>
    <id>1</id>
    <list>a</list>
    <list>b</list>
    <list>c</list>
</root>
Converting this XML back to JSON, there are a couple of gotchas:
{
    "name": "Example",
    "id": "1",
    "list": [
        "a",
        "b",
        "c"
    ]
}
We can see that id has now lost its integer type.
Let's use the same example, modified slightly to have only a single item in the array:
{
    "name": "Example",
    "id": "1",
    "list": "a"
}
The array in list has disappeared! This is because the XML without types has no context of what type the element had before conversion.
Let's have a look at the JsonToXml which preserves types: JsonToXml (using the modified input)
{
    "id": 1,
    "name": "Example",
    "list": [
        "a"
    ]
}
XML result
<?xml version="1.0" encoding="UTF-8"?>
<root>
    <id type="number">1</id>
    <name type="string">Example</name>
    <list class="array">
        <element type="string">a</element>
    </list>
</root>
With types enabled, the result still has the array and the integer type of id is preserved:
{
    "id": 1,
    "name": "Example",
    "list": [
        "a"
    ]
}
After converting the JSON to XML, I set the shipmentId on a header for later use with an XPath expression: /shipment/id/text(). Next is the XSLT component where I add my mapping that I created with MapForce. I have uploaded my shipment mapping and event mapping for anyone to use.
I'm not going to explain MapForce in detail, that could be a whole blogpost in itself. If you are interested in this, then by all means let me know! In the meantime, if you want to get an impression of MapForce I strongly recommend checking out Altova MapForce and Flowforce overview by Luke Saunders.
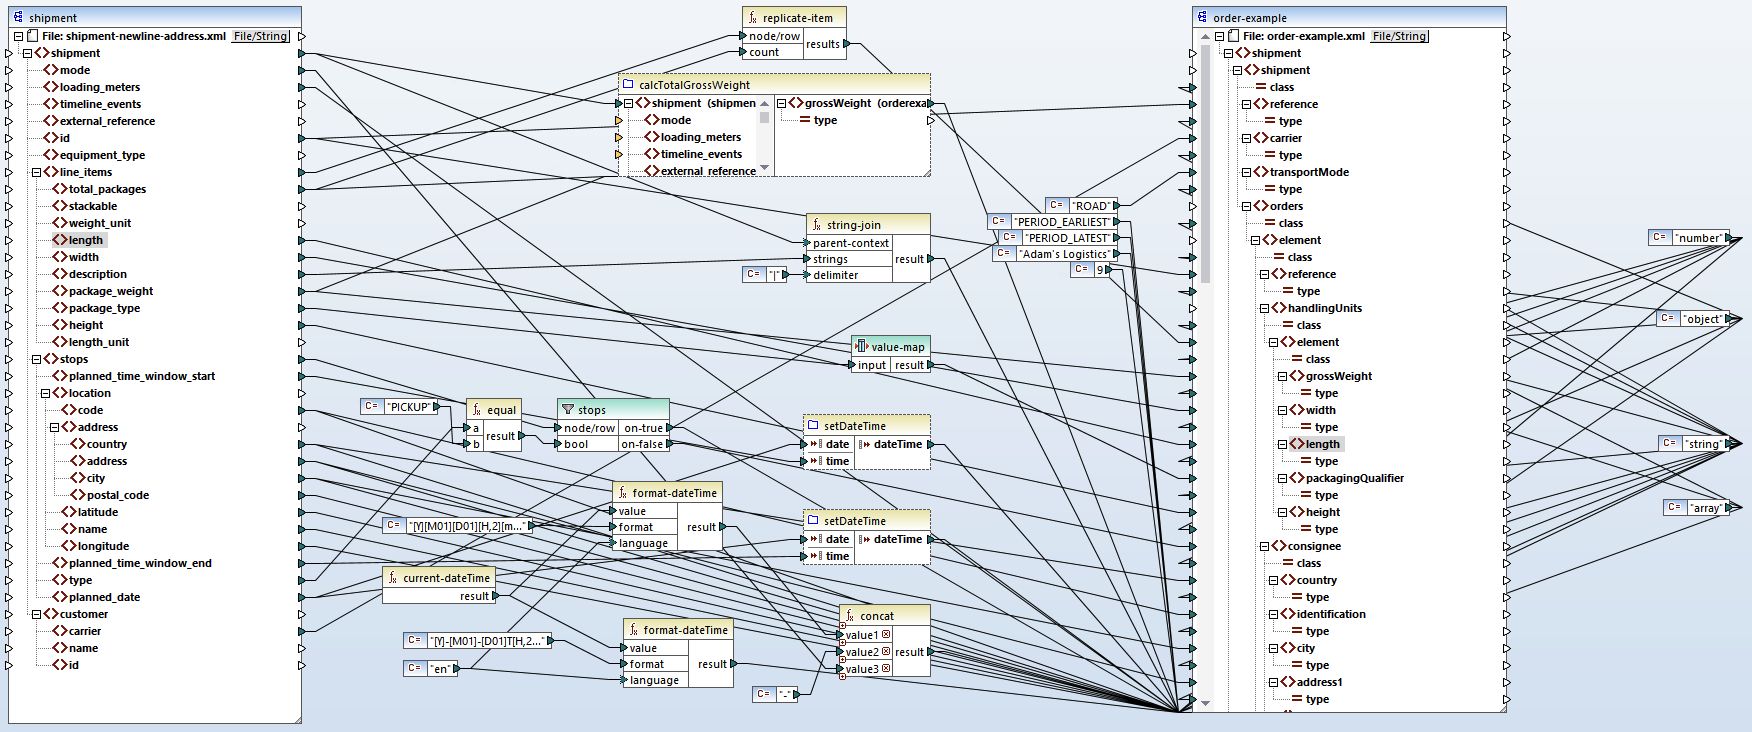
I'll briefly explain what's going on in the data mapping (See the full mapping requirements for context).
- Un-nest line items to handling units
- Each line_item gets replicated by its total_packages count. So 3 line items with 4, 1, and 3 packages become 8 individual handlingUnits
- Concatenate goods descriptions
- Join all line_item descriptions with a pipe separator into a single goodsDescription field
- Calculate total gross weight
- Sum the package_weight × total_packages across all line items
- Filter stops by type
- Split the stops array into separate pickUp and consignee objects based on the type field (PICKUP vs DELIVERY)
- Combine date and time fields
- Merge planned_date with time_window_start/end to create ISO datetime strings
- Map package types
- Transform TMS codes to broker codes (BALE -> BL, CYLINDER -> CY, etc.)
- Generate message metadata
- Set messageDate to current timestamp
- Use shipment id as messageReference
- Add fixed senderId and messageFunction
Next, I have added a XmlToJson component with type hints set to true. This creates a perfect JSON for our API which is then sent to the #{base_url}/api/v1/broker/order endpoint with the HTTP component. This time I set the Use error route? option to false. This means that all HTTP response codes will be handled by the flow itself and not the dedicated error flow.
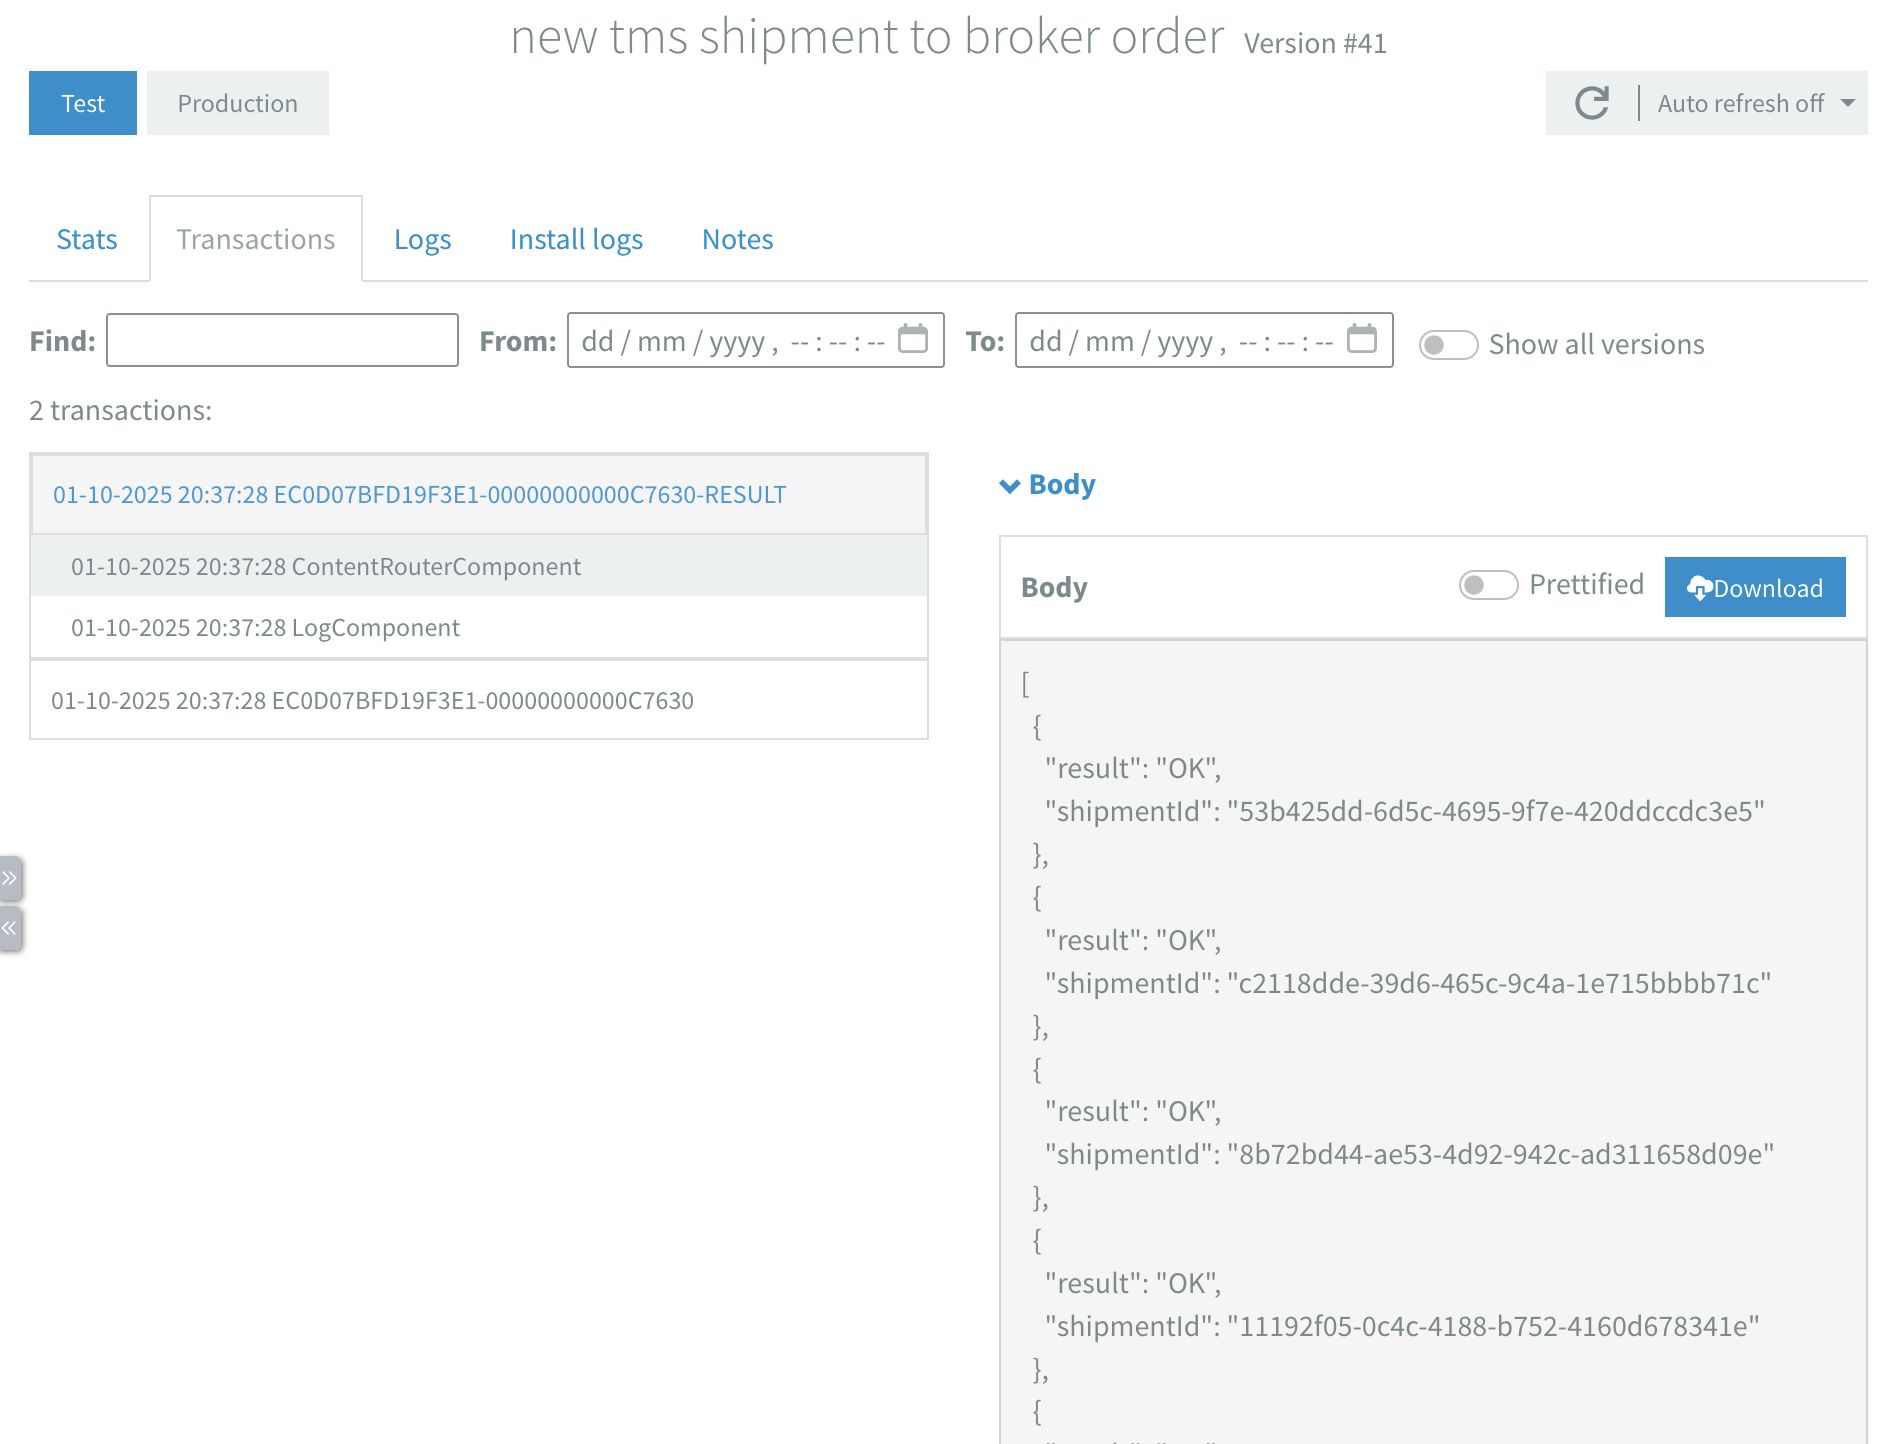
As I mentioned earlier, the result of this sub-process gets aggregated and sent back to the main flow. If I end this sub-process with the result of the API, then the main process will continue with a list of raw API responses (either shipments or error messages). To give the output a uniform structure, I like to add a custom response based on the API result. This makes the aggregated result easier to process:
[
	{
		"shipmentId": 1,
		"result":"OK"
	},
	{
		"shipmentId": 2,
		"result": "ERROR",
		"details": "detailed error message here."
	},
	{
		"shipmentId": 3,
		"result":"OK"
	}
]
This is done by adding a content router after the HTTP component. Since I know that the API will return a HTTP 202 on success, I have added the following rule to the content router:
${header.CamelHttpResponseCode} == 202. This routes all successful responses to a dedicated branch. I then set the body of that branch to:
{
	"shipmentId": "${header.shipment-id}",
	"result":"OK"
}
Here we can see why the shipment Id was set on a header.
All unsuccessful responses are sent to the otherwise branch. I then set the body of that branch to:
{
	"shipmentId": "${header.shipment-id}",
	"result": "ERROR",
	"details": ${bodyAs(String)}
}
Because I know that any unsuccessful response will contain an error message in the body, I've included the API's error message in the details field with :${bodyAs(String)}.
In the main flow, the first thing I do after the split component is set a new breadcrumbId with the simple expression: ${header.breadcrumbId}-RESULT The breadcrumbId is a unique id used for tracking messages in the transaction logs. Once a flow starts, all transactions are grouped by this breadcrumbId.
Since I aggregated my results, I'm not really interested in all the individual transactions and certainly don't want to scroll through all of them before finding my result. Changing this id after the aggregation lets me filter the transaction logs to see only the final aggregated result rather than each individual shipment processing.
Last thing left in the flow is handling errors. We can add a content-router with the JSONPath expression: $..[?(@.result == 'ERROR')] and add whatever error handling logic suits our needs. For example, send a notification, save it to a database or both.
Building the Broker event to TMS event flow
If you made it this far then great! I have introduced you to most of the concepts that are needed to build this flow.
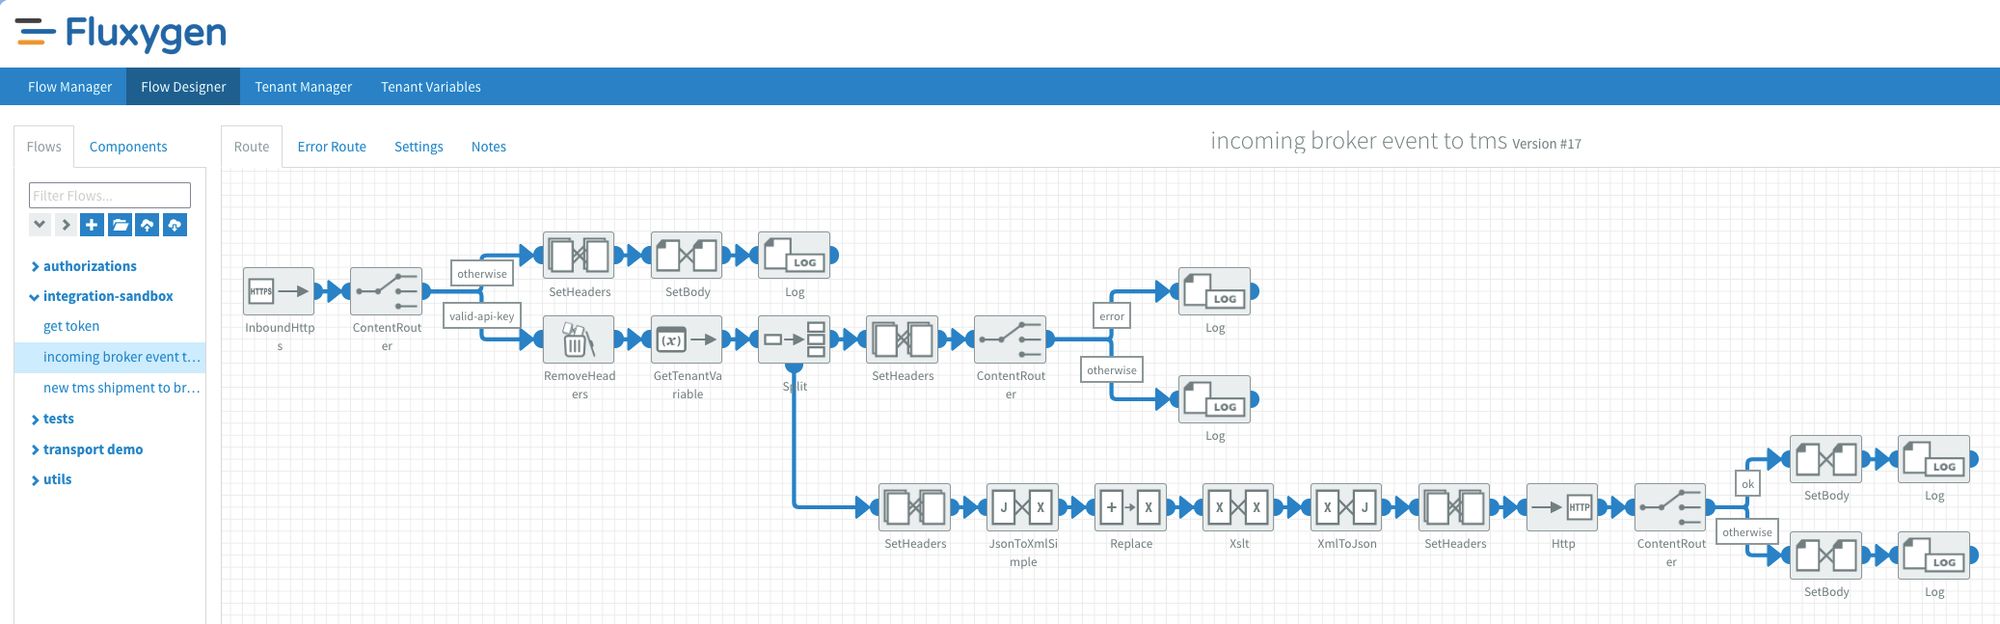
This flow starts with an InboundHttps component that lets me expose a public endpoint for receiving HTTP messages. Next, I used a content router that validates the incoming X-API-KEY header with a flow property. If the header matches my property, it continues the route. If not, then I return an HTTP 401 by setting a CamelHTTPResponseCode header with the value 401.
Fluxygen's inbound auth is limited to header filtering. It does not come with an identity and access management (IAM) solution out of the box for securing public endpoints (unfortunately this is not rare in our industry). Fortunately, header filtering includes X-Forwarded-For and X-Real-IP headers that are injected by the platform's reverse proxy, which can't be spoofed by clients. So IP filtering is also possible, just implemented at the application layer instead of the network level.
If OAuth validation is a hard requirement then you will need an external IAM service like Keycloak. The rest of the flow is very similar to what I did in the new shipment flow:
- split the array of events in single events while collecting the responses
- transform using xslt and send to the sandbox API
- check the collected responses for potential errors and handle accordingly
Wrapping up
In this post I walked you through the integration processes available in the integration sandbox. Then I explained how to implement them in Fluxygen. First I built a scheduled flow that handled getting, transforming and sending new shipments. And I explained why and how I use each component.
At the end I showed an example of a flow that can receive events. Here I explained that most of the patterns used are similar. If you followed along, we've covered the basics of:
- Scheduling / batch processing
- Receiving and sending messages via APIs/webhooks
- Data transformation and mapping
- Conditional routing
- Error handling
- Authentication
What's next?
In the next weeks I'm going to test the sandbox with Azure Logic Apps and n8n.
What do you think of this kind of content? I'd love to hear your thoughts, experiences, or even just a quick hello!