Testing the integration sandbox with Azure Logic Apps
February 18, 2026
Intro
Azure Logic Apps has been on my list to revisit for quite some time. It's Microsoft Azure's primary solution for building integration workflows. I even felt a bit of FOMO after missing a previous opportunity to work with it professionally. So I'm glad to finally try it out with my integration sandbox.
Logic Apps is part of Azure's Integration Services, which is a suite of services that enable enterprises to integrate applications, data, and processes. In other words: if you want to build / manage / orchestrate integration workflows, data pipelines, APIs, messaging or serverless functions. This is the category for you.
Being part of the Azure platform, there is a steeper learning curve than the integration tools that I wrote about previously. In return you get all the fine grain control and scalability options any bigger enterprise could desire. Having said that, I also found myself rediscovering that there is a "Microsoft way" of doing things.
For this blog post I'm going to focus on solely Logic Apps. The platform claims to "enable businesses to orchestrate workflows and multi-agent business processes at Azure scale". Just like the other tools we've seen so far, it has a visual workflow designer in the browser. It also has 1400+ connectors -which is the highest we've seen so far- and it has options to build your own. If all fails, it's also possible to add custom code in Python, C#, PowerShell, or JavaScript.
And maybe my favourite new shiny object to try out: the VSCode extension for building workflows and data mappings!
As I've written in my previous posts, integration architecture still requires thinking through data flows, error handling, and business logic. The platform gives you the tools, but doesn't do the thinking for you.
Let's see how it all comes together!
Processes walkthrough
Click to hide section.
If you have read my previous posts about the sandbox, you can probably skip this section.There are two processes in the sandbox that I want to integrate:
- TMS shipment to Broker order
- Broker event to TMS event
As mentioned in the docs, the APIs are secured. We'll handle this globally for both the processes. Let's have a look at an overview of the processes that we're going to integrate:
Authentication
The sandbox's APIs are secured by OAuth2 authentication that provides a JWT (JSON Web Token). It's possible to use a password grant and a client_credentials grant. These tokens expire every 15 minutes, so we'll need to make sure these credentials are refreshed automatically.
TMS shipment to Broker order
The TMS shipments will be pulled periodically from the TMS API and then transformed and delivered to the Broker API.
flowchart TD
A@{ shape: circle, label: "start" } --> B
B@{ shape: rect, label: "get new shipments" } --> C0
C0@{shape: diam, label: "any \nshipments?"}
		C0 --> |Yes| C
		C0 --> |No| C2@{shape: framed-circle, label: "end"}
subgraph for each shipment
	C@{shape: lean-r, label: "transform to order"} --> D
	D@{shape: rect, label: "post order"} --> E
	E@{shape: rect, label: "log result"}
end
E --> F@{shape: diam, label: "success?"}
		F --> |Yes| G@{shape: framed-circle, label: "end"}
		F --> |No| H@{shape: rect, label: "handle errors"}
- Scheduler starts the process
- Get new shipments from the /tms/shipments endpoint
- Check for shipments in response
- Split shipments payload into a sequence of single shipments (for each)
- Perform a data mapping to the broker format
- Create the order with the /broker/order endpoint
- Log the result
- Check the aggregated results for errors and handle if necessary.
Broker event to TMS event
The broker events are sent to a webhook which will transform and deliver them to the TMS API:
flowchart TD
A@{ shape: circle, label: "start" } --> B
B@{ shape: rect, label: "check api key" } --> C
C@{shape: diam, label: "valid?"}
		C --> |Yes| D
		C --> |No| E@{shape: rect, label: "return HTTP 401"}
D@{shape: lean-r, label: "transform to tms event"} --> F
F@{shape: rect, label: "post event"} --> G
G@{shape: diam, label: "success?"}
		G --> |Yes| H@{shape: framed-circle, label: "End"}
		G --> |No| I@{shape: rect, label: "handle errors"}
- Inbound HTTP message starts the process
- The incoming webhook API token is validated.
X-API-KEY - Perform a data mapping to the tms format
- Create the event with the tms/event/shipment_id endpoint
- Log the result
Integrating with Logic Apps
Once the processes are clear we can start integrating. If you want to follow along, you must have an Azure account. Newcomers can register for a 30 day trial period with $200 of credits.
Not all services are supported in this trial. I started out with the consumption hosting option of Logic Apps but along the way I switched to standard hosting, which isn't supported. I switched because I noticed that the VSCode plugins of the consumption model weren't up to date, the built in managed identity was not supported for the keyvault component and data mappings required an expensive "Integration account" costing ~$300 per month. If you forget to check the costs (like I did) it will make a nice dent in those credits!
So if you follow everything to the T, you will have some minor costs (<10$). Just make sure to clean up your resources after you're done. I also shared my repository with the project for anyone to use.
Resources to get going
Usually I write a quick overview but this is Microsoft Azure we're dealing with here. There is no such thing as a quick overview. Instead I'm going to share some of my favourite resources I used to get up to speed and shamelessly assume that you are familiarised with the Azure portal.
I found Steven W. Thomas from the Microsoft Azure Developers channel to provide an excellent intro / refresher on Logic Apps including creating the first app and setting up VSCode. How to build and manage Azure Logic Apps by Luke Saunders is another great introduction that goes a bit more in depth working with the Logic Apps portal. If you like integration content, be sure to check his channel out!
Then from there I found the How-to guides -> Develop section in the official docs to be very useful. In my opinion there's an art to navigating the Microsoft docs. Sometimes I find myself chasing down circular referenced links, but when I eventually find the page I need, the information is mostly solid.
A couple specific searches led me to a blog series by Sandro Pereira from Turbo360 covering Logic App best practices, tips and tricks.
Setting up the Azure connection with VSCode did give me some headache though. For some reason I could use my account with the plugins and browse my Azure resources, but anything else required me to sign in again and resulted in the following error:
unauthorized_client: The client does not exist or is not enabled for consumers. If you are the application developer, configure a new application through the App Registrations in the Azure Portal at https://go.microsoft.com/fwlink/?linkid=2083908.Consumer in this context turned out to refer to a personal / consumer account. Even though I used my professional email and I had created an Azure account with it, Microsoft picked it up as a personal account because I also had used that e-mail to create a Microsoft account for the free version of Microsoft Teams. I ended up creating a new Entra ID user account under my subscription and used that to sign in which resolved the issue.
Setting up the authentication workflow
Being a bit spoiled by n8n's approach to OAuth the previous time, I was hoping for something similar in Azure. I looked into the option of creating my own component that uses the OpenAPI definition but it turns out that the OpenAPI definition 3.1. of my sandbox is not yet supported. The highest supported version is 2.0. Too bad!
A manual attempt to create the component stranded because I had to configure a callback URL. Unfortunately this meant that my new client_credentials flow was not supported. So I ended up choosing to build a separate Logic App that would refresh the credentials on a schedule and store the new Bearer token in an Azure Key vault.
Key Vault is a service that lets users manage secrets in a secure way without saving them in the Logic App project. It does require some minor preparation. I Created a new key vault in the same resource group as my Logic Apps and created new secrets for storing the Bearer token, client secret and webhook key. This didn't work at first as I expected, even though I am the admin, I still had to assign myself the "Key Vault Administrator" role to be able to create secrets.
With VSCode ready to go in a fresh workspace it's very easy to create a new workflow by opening the command box (CMD + SHIFT + P on Mac) and type workflow and hit enter.

Because I wanted to keep track of the inputs and outputs of previous events I chose a stateful workflow and gave it the name Authentication. Stateless means in essence the inverse of this. Want to know more details between stateless and stateful? Make sure to read this article.
The command created a new folder with a workflow.json file. Once this file is selected it's possible to run the Open Designer command to open the workflow designer.

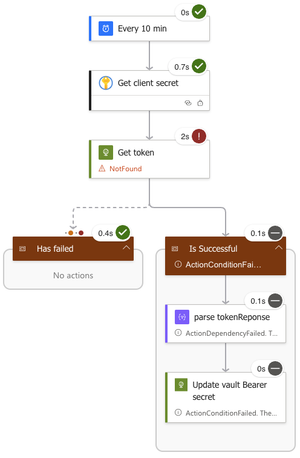
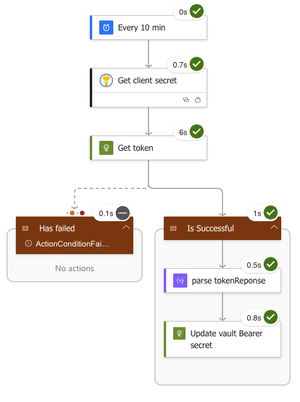
This is what I came up with:

-
The workflow is trigged every 10 minutes by a scheduler.
-
A Key Vault get secret action gets the client_secret secret out of the Key Vault.
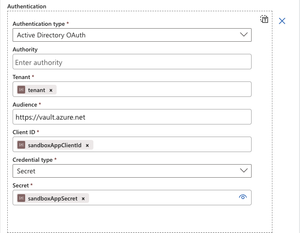
- I chose to sign in with Entra for creating the connection.
- Later on I built a script that allows me to change the connection to a managed system identity before deploying to the Azure cloud so that the implementation was not tied to my user account.
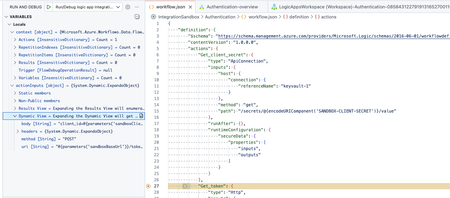
-
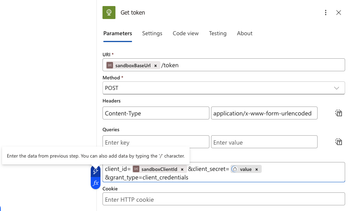
A HTTP action named Get token calls the sandbox's /token url with the client_credentials grant payload to request the Bearer token.
- I added static variables like the base url and client*id to the parameters.json so that I can reuse these in other workflows.
- A small lightning icon appears in the Body field of the action once it is active. This feature let's me easily add the parameters and data from the previous steps.
-
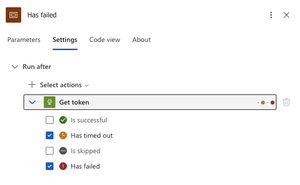
Two scope actions are added. Scopes are a great way to define a dedicated branch of the process that should run after a certain condition is met.
-
In this case the Has failed scope is set to run after the Get token action has failed (HTTP error code) or timed out. Enabling us to add some logic to handle this error.
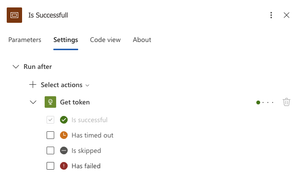
-
The Is Successful scope is set to run after the Get token action is successful.
-
-
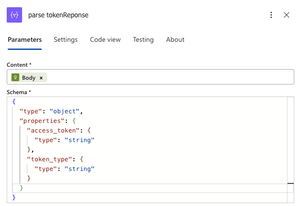
Within the successful scope I first parse the json response of the API. This enables me to access the data of the json further down stream.
-
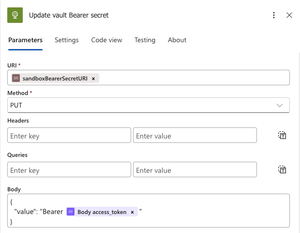
Last I use a HTTP action that calls the Key Vault API to update the Bearer token. There is no Key Vault action to update secrets form Logic Apps, but fortunately we can use the REST API to do this. The Set secret action will create a new version for a given secret or create a secret if it does not already exist with that name.
- To get this going locally I had to create service principal and make it a member of a group that has the Key Vault Secrets Officer Role.
- Going to the secret in the Azure portal gives you the option to copy the Secret Identifier which is the URI of the secret. To be able to acces the secret via the API you will need to remove the secret version from the URI and add the API version. The end result will look something like this:
{vaultBaseUrl}/secrets/{secret-name}?api-version=2025-07-01
Testing and debugging
Testing and debugging the workflow is fairly straightforward. It's possible to add breakpoints to the the workflow.json and then press F5 or run the command Debug: Start Debugging.
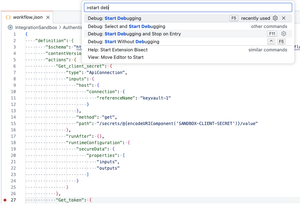
This will start the debugger. Then from there you can run the command Azure Logic Apps: Overview.
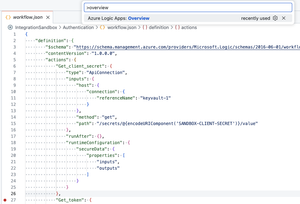
The overview shows the options for running the trigger and viewing the previous runs.
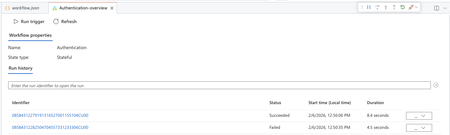
I really liked this feature because it let's me watch and inspect the current variables on that point in time. Each run can be inspected by clicking on the Identifier. Doing so will open a view similar to the designer and from there it's possible to view the inputs and outputs per action.
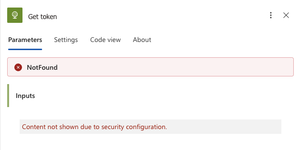
The key vault results are hidden due to security considerations.
If all checkmarks are green, the run was successful!
Building the TMS shipment to Broker order workflow
After seeding 1000 new shipments in the sandbox, I created a workflow called ShipmentsToOrders.
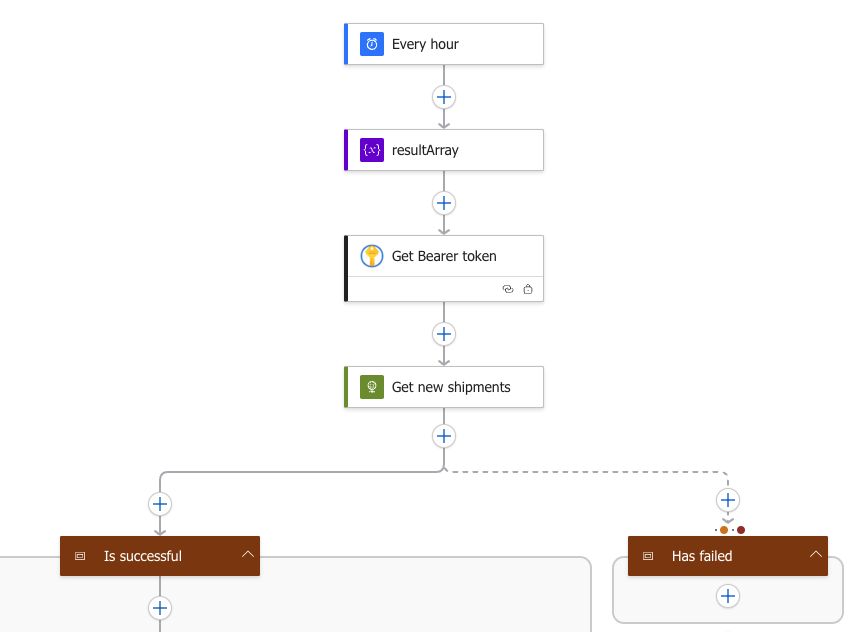
- The workflow starts with a scheduler that triggers every hour.
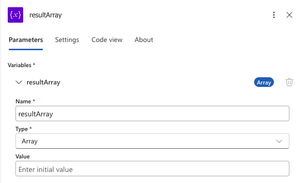
- Immediately after the trigger of the flow a new array variable resultArray is initialised that will be used further down the workflow to store the response status of the individual order creation.
- A Key Vault get secret action gets the bearer token out of the Key Vault.
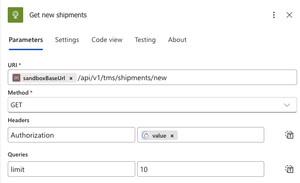
- A HTTP action gets the new shipments from the API.
- For testing purposes I set the limit to 10 which allows me to process 10 shipments at a time.
- Two scopes are added to handle either successful or failed responses from the Get new shipments action.
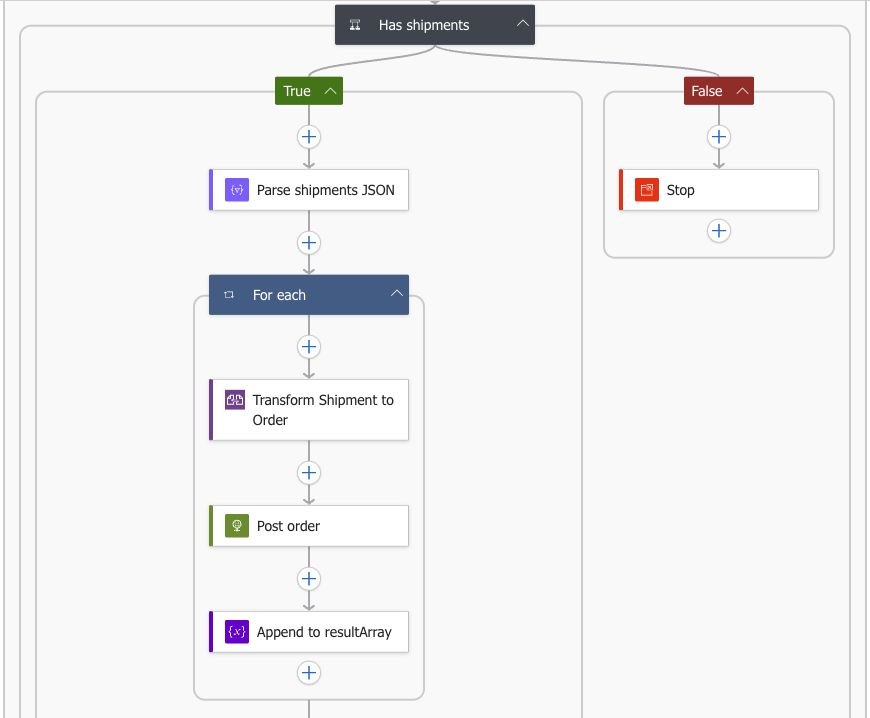
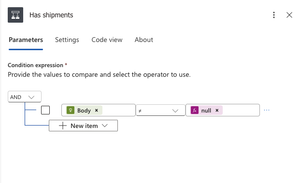
- The response body of the shipments API will be empty if there are no new shipments. A conditional Has shipments action is added to prevent any empty payload from being processed further.
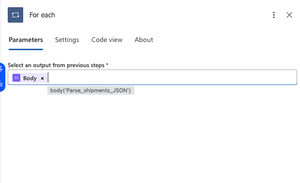
- Next, the shipments JSON is parsed to an object which will allow me to process each individual item in a For each action.
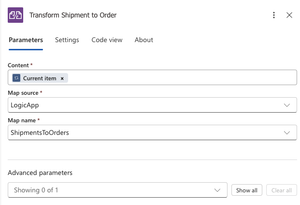
- The shipment payload is transformed to the broker format using a Liquid JSON to JSON action.
- Wait? No data mapper? At first I dismissed using the mapper since I read Data Mapper XSLT and my brain immediately thought XML transformations. So for this mapping I went ahead and wrote a liquid template. Later when tinkering with it I discovered that it also works with JSON. And in fact that it is possible to work with JSON in XSLT.
- The transformed payload is posted to the order API.

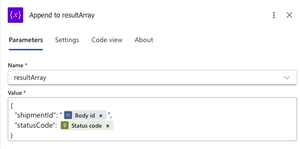
- The shipmentId and HTTP status code are added to the resultArray using an Append to array variable action.
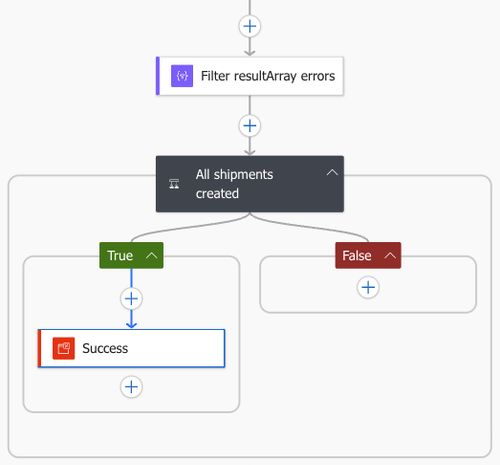
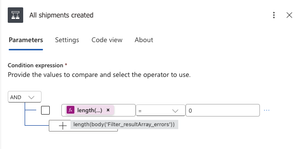
- After the loop a Filter array action is used to filter out any unsuccessful status codes.

- The resulting array is then checked with a condition. If the length of the body is 0 then we have no errors, otherwise errors are captured for handling.
Et voila! Executing the workflow results in 10 processed shipments that are validated by the sandbox!
Liquid data mapping
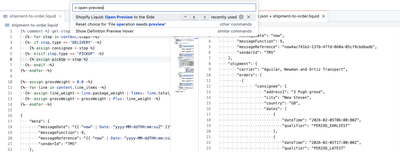
Let's dive a bit deeper into the data mapping that I brushed over earlier. Liquid is a open source templating language written in Ruby and created by Shopify. Since Azure Logic Apps does not run on ruby but .NET it uses the DotLiquid implementation for Liquid. In practice this meant that there are some differences between the two to keep in mind. The most notable differences for me where that I had to capitalise the name of the functions and that the time formatting worked a bit different. And I found out by trial and error that the Logic Apps parser expects the JSON to be wrapped in a content object: {"content":{ json to transform here}}.
As usual, I followed the sandbox's mapping requirements to get to the desired broker order format. At first I started out with the online LiquidJS playground which has a very handy interface to begin templating. But I did not fancy copy and pasting between my browser and VSCode so I eventually settled for an older plugin called Shopify Liquid Preview for Visual Studio Code. This plugin had exactly what I wanted: Live editing a template with preview. All I needed to do was create a .liquid file and a .json file with the same name and I could run the preview command. Sweet!
The end result of the data mapping does the following:
Generate message metadata
- Set messageDate to current timestamp.
"{{ "now" | Date: "yyyy-MM-ddTHH:mm:ssZ" }}" Note that the date format differs from the Shopify implementation. Which would have been something like "now" | date: "%Y-%m-%d %H:%M".
- Set custom messageReference with
`"{{ "now" | Date: "yyyy-MM-ddTHH:mm:ssZ" }}{{ content.id }}"` content.id follows a nice dot notation like convention for accessing the data.
- Add fixed senderId and messageFunction.
Stops to separate pickUp and consignee objects
- Split the stops array into separate pickUp and consignee objects and assign these to a variable based on the type field (PICKUP vs DELIVERY).
   {%- for stop in content.stops -%}
      {%- if stop.type == 'DELIVERY' -%}
         {% assign consignee = stop %}
      {%- elsif stop.type == 'PICKUP' -%}
         {% assign pickUp = stop %}
      {%- endif -%}
   {%- endfor -%}
These object are then very easy to query inline. For example:
"city": "{{ consignee.location.address.city }}"Concatenate goods descriptions
- Join all line_item descriptions with a pipe separator into a single goodsDescription field.
"goodsDescription": "{% for line in content.line_items %}{{ line.description }}{% unless forloop.last %}|{% endunless %}{% endfor %}"unlessandendunlessmake sure that the pipe seperator is not added after the last description.- I initially used a map but this did not work in the dotnet version. The map approach that failed:
{% failed map approach %}
"goodsDescription": "{{ content.line_items | map: "description" | join: "|" }}"
Expanding line items to handling units
- Each line_item gets replicated by its total_packages count. So 3 line items with 4, 1, and 3 packages become 8 individual handlingUnits.
{%- for line in content.line_items -%}
    {% comment %} package_type mapping {% endcomment %}
    ...

    {%- for i in (1..line.total_packages) -%}
        {
            "grossWeight": {{ line.package_weight }},
            "height": {{ line.height }},
            "length": {{ line.length }},
            "width": {{ line.width }},
            "packagingQualifier": "{{ packagingQualifier }}"
        }{% unless forloop.last %},{% endunless %}
    {%- endfor -%}{% unless forloop.last %},{% endunless %}
{%- endfor -%}
In this case I chose to loop over each line item and then within that loop I loop again over the range of the quantity. The unless and endunless trick is used to ensure that the lines follow the JSON array syntax for comma's.
- Map TMS package types to broker packagingQualifier.
{%- case line.package_type -%}
    {%- when 'BALE' -%}{%- assign packagingQualifier = 'BL' -%}
    {%- when 'BOX' -%}{%- assign packagingQualifier = 'BX' -%}
    {%- when 'COIL' -%}{%- assign packagingQualifier = 'CL' -%}
    {%- when 'CYLINDER' -%}{%- assign packagingQualifier = 'CY' -%}
    {%- when 'DRUM' -%}{%- assign packagingQualifier = 'DR' -%}
    {%- when 'OTHER' -%}{%- assign packagingQualifier = 'OT' -%}
    {%- when 'PLT' -%}{%- assign packagingQualifier = 'PL' -%}
    {%- when 'CRATE' -%}{%- assign packagingQualifier = 'CR' -%}
{%- endcase -%}
If an unmapped package_type comes through, Liquid will leave packagingQualifier undefined. I could also have added a default here.
Combine date and time fields
- Merge planned_date with time_window_start/end to create ISO datetime strings
{
   "dateTime": "{{ pickUp.planned_date }}T{{ pickUp.planned_time_window_start }}Z",
   "qualifier": "PERIOD_EARLIEST"
}
Calculate total gross weight
- Sum the package_weight × total_packages across all line items and assign it to a variable
{%- assign grossWeight = 0.0 -%}
{%- for line in content.line_items -%}
  {%- assign line_weight = line.package_weight | Times: line.total_packages -%}
  {%- assign grossWeight = grossWeight | Plus: line_weight -%}
{%- endfor -%}- Use the weight and round it to 2 decimal places.
"grossWeight": {{ grossWeight | round: 2 }}All other fields were mapped directly.
Building the broker event to TMS event workflow
Now on to the event workflow. This time I desperately wanted to try out the Data Mapper. I quickly found out that it has some limitations, one of them being: Data Mapper currently works only in Visual Studio Code running on Windows operating systems. Unfortunately -for me as a Mac user- this meant switching to Windows. So for the last part I spun up a Windows 11 x64 VM on my homeserver. I actually started out with a ARM VM on my Mac but this gave me some compatibility issues that I wasn't interested in debugging.
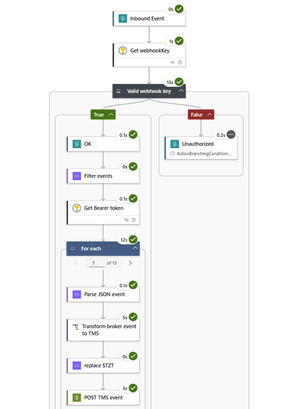
After having installed, configured and debloated Windows, this is what I came up with:
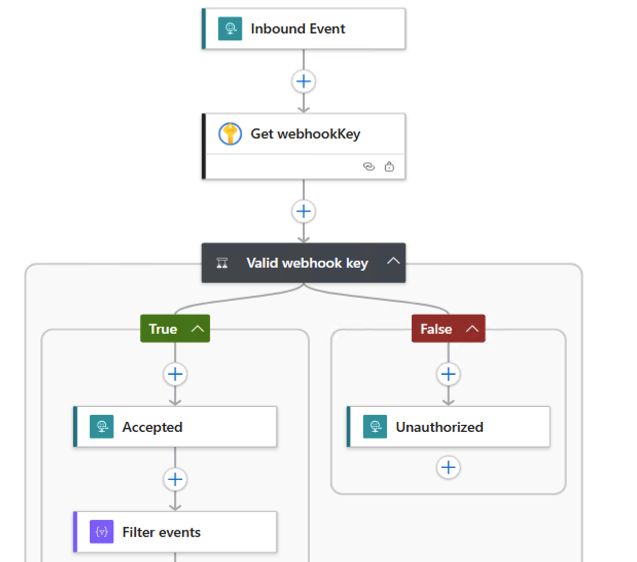
-
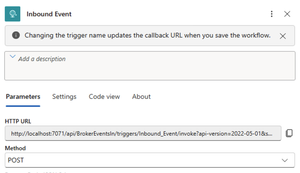
The workflow gets triggered by an Inbound Event action that is set to the method POST. Making sure that the workflow will listen on an endpoint that can receive HTTP messages.
-
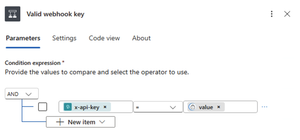
The sandbox will send a X-API-KEY header with a secret value for each incoming message. I stored the secret in Key Vault so that I can retrieve it with the Get Secret action and validate it against the incoming header with the Conditional action.
@triggerOutputs()?['headers']?['x-api-key']question marks are used to avoid getting an error if the header does not exist.
-
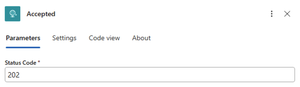
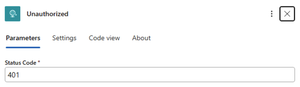
If the incoming key is valid a Response action is triggered with HTTP status code 202 that will be returned to the sender immediately. Indicating that the integration got the message but are still processing it. If the incoming key is invalid then it returns a status code 401.
-
With a Array filter action I check for the existence of shipmentId's in the body. In this case I check if the length of the shipmentId key is greater than 0.
length(item()?['shipmentId'])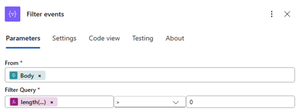
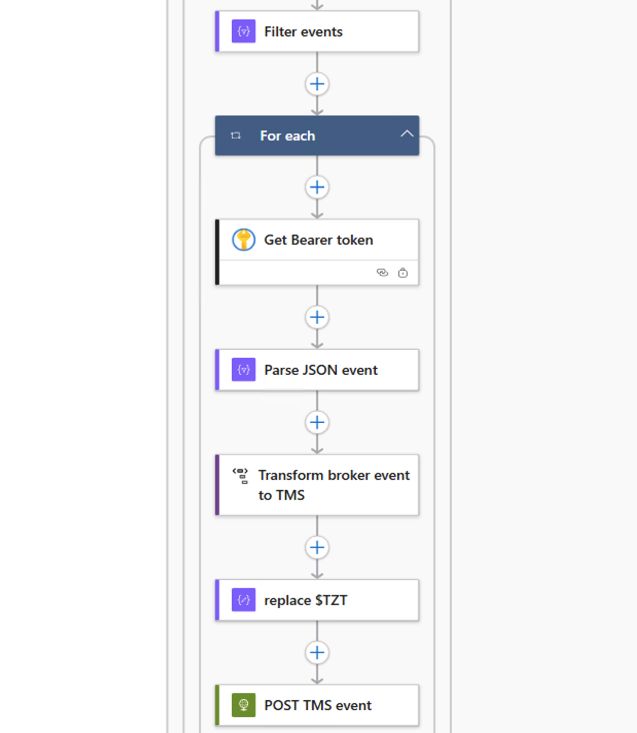
-
From here on the events are transformed and sent to the sandbox for validation in a loop. First I get the Bearer token out of the Key Vault. Getting the token inside the loop might seem inefficient, but doing it outside increases our chances of having an invalid token by the time we process later events.
-
The JSON payload is parsed because I need to use the shipmentId later which is stripped out during the transformation.
-
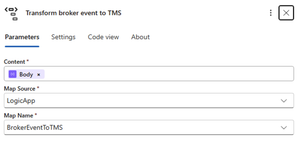
A XSLT DataMapper action performs the transformation. More on this later.
-
An issue I ran into while using the Data Mapper was that it automatically converts ISO-formatted strings to datetime objects, even when the schema explicitly defines them as strings. So in my case a string with the value
2026-02-23T10:29:36.694588would be seen as a time in my local timezone and converted back to a UTC string with a time offset.I double checked my schemas, tried casting the values explicitly to a string and even concatenating substrings without success. Since we don't always have the luxury of changing the issue in the source I worked around it with a hacky solution: concatenating
$TZTto the end of the string and removing it with a compose action after the data mapping. I used $TZT as a marker because it's unlikely to appear naturally in real data.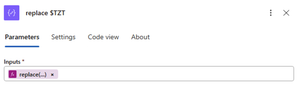
replace(string(body('Transform_broker_event_to_TMS')), '$TZT', '')
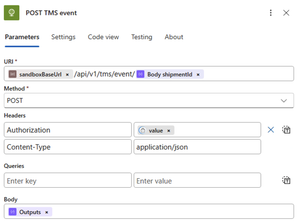
-
Last the newly transformed Body is sent to the sandbox.
After triggering some events from sandbox to the Inbound Event I got some nice green checkmarks!
Now let's look at the Data Mapper in detail!
DataMapper
On the Azure plugin tab in VSCode there is a extra section called Data Mapper.
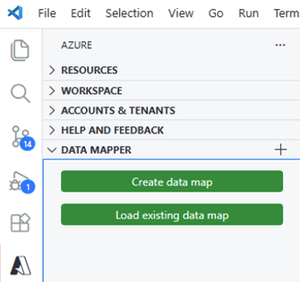
When a new map is created, users must first define a Source and a Destination. This is done by selecting a schema. For my Broker and TMS event payloads I decided to generate a schema with the Parse JSON action and save it in the Artifacts/Schemas directory.
Once the schemas are selected it's possible to link fields from the source to the target with a drag and drop interface. Transformations are applied by adding functions in between. There are a whole lot of pre-defined functions available and it is also possible to create your own function.
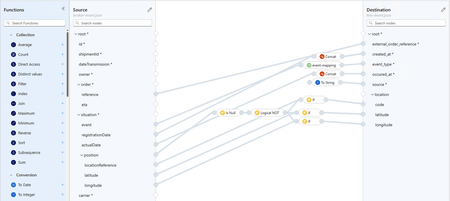
As mentioned earlier, the Data Mapper uses XSLT under the hood. Even for JSON! If we look at the generated XSLT in the Maps folder we can see that it uses a json-to-xml() function that is available in XSLT 3.0 and XPATH 3.1.
<xsl:variable name="xmlinput" select="json-to-xml(/)" />Further in the document values are then referenced with:
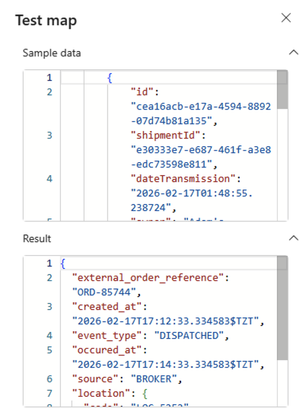
<string key="external_order_reference">{/*/*[@key='order']/*[@key='reference']}</string>It also has a small testing panel that let's users test the output of the mapping immediately. Unfortunately it isn't resizable, but it works well!
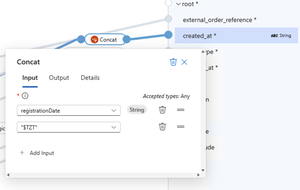
Date strings
As mentioned in the walkthrough of the workflow I used a hacky workaround to prevent the date time string from being processed as a date object. This is done by adding a Concat function.
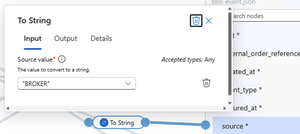
Fixed values
For the source field I needed to set a fixed value of BROKER. I could not see a function or option for this to I chose to add a To String function and gave that a fixed value as input.
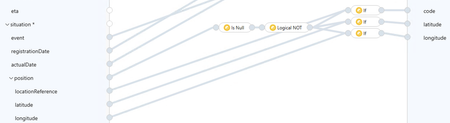
Null safe position
If an order is created or cancelled then it will not have a position in the event data. In this case I want to map data when the position is not null. A Is Null function is added followed by a Logical Not which inverses the boolean. Basically making it a Not Null check. Which is then used in an if statement to map the corresponding fields.
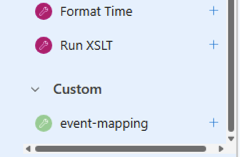
Custom key-value map function
To map the values of the situation.event field to the corresponding TMS event_type I created a custom function. This is because the Data Mapper doesn't include a key-value mapping function and the If-Else function only supports single-condition branches.
In the Artifacts\DataMapper\Extensions\Functions folder I created a CustomFunctions.xml with the following contents:
<?xml version="1.0" encoding="utf-8" ?>
<customfunctions>
   <function name="event-mapping" as="xs:string" description="Evaluates the condition and returns corresponding value.">
      <param name="eventType" as="xs:string"/>
   <value-of select="
        let $eventMap := map{
          'ORDER_CREATED':'BOOKED',
          'DRIVING_TO_LOAD':'DISPATCHED',
          'ORDER_LOADED':'PICKED_UP',
          'ETA_EVENT':'ETA_CHANGED',
          'ORDER_DELIVERED':'DELIVERED',
          'CANCEL_ORDER':'CANCELLED'
        }
        return $eventMap($eventType)
      "/>
   </function>
</customfunctions>
Any stylesheet function within the <customfunctions> node will be picked up by the Data Mapper as a custom function.
Also new since XSLT 3.0 is the map function which gives us a key and value structure with a couple of features. It allows the shorthand $map(key) for accessing values.
In my event-mapping above I take in a string parameter called eventType. Then I select the value of a inline call to my value map which uses the parameter as a key to get the value.
And there we have it! All of the fields are mapped.
Wrapping up
If you made it this far then hats off to you! This post got quite lengthy without even diving much into error handling or deploying the resources to Azure. Nevertheless I still think there are some nice gems here that could be very helpful for anyone looking into Logic Apps.
To recap, we did the following:
- Walked through the integration processes available in the integration sandbox.
- Provided an overview of the right resources to setup Logic Apps and VSCode
- Built a flow that handled authentication and stored values in Key Vault secrets
- Retrieved, transformed, and sent new shipments
- Handled incoming webhook events with validation
- Transformed data with Liquid and with the Data Mapper
All while explaining why and how I use each component and which challenges I faced along the way!
Thank you for discovering Azure Logic Apps with me! What do you think of this kind of content? I'd love to hear your thoughts, experiences, or even just a quick hello!