Testing the integration sandbox with n8n
December 11, 2025
Intro
This week's test subject is the n8n workflow automation platform. N8n claims to be simple enough to ship in hours and sophisticated enough to scale. This made me eager to try out what it's all about and see how it works with my integration sandbox.
N8n is a fair-code workflow automation platform aimed to give technical teams the flexibility of code with the speed of no-code. Fair-code meaning it's generally free to use and open source, but restricted to prevent other companies from commercializing it. Customers can self-host or use their cloud offering.
The platform lets you build automations with the help of a visual editor that provides the building blocks (called nodes) to use and develop integrations. It comes with a big collection of ready to use connections to specific cloud services. Think of services like Slack, Google sheets or Jira. They market themselves as AI native, which in practice means that they have pre-built nodes to interact with popular AI models like Anthropic and OpenAI. I haven't tested these features since they are out of scope of my sandbox test. Developers can also build their own nodes or use a code node to add custom code. They also have an active community where users can share automation templates.
As I've written in my previous posts, integration architecture still requires thinking through data flows, error handling, and business logic. The platform gives you the tools, but doesn't do the thinking for you.
Under the hood n8n is built in TypeScript and it deploys a master and worker nodes style architecture that can be scaled if necessary.
Let's see how it all comes together in n8n!
Processes walkthrough
Click to hide section.
If you have read my previous posts about the sandbox, you can probably skip this section. In contrast to the last posts, I have added a OAuth client_credentials grant capability.There are two processes in the sandbox that I want to integrate:
- TMS shipment to Broker order
- Broker event to TMS event
As mentioned in the docs, the APIs are secured. We'll handle this globally for both the processes. Let's have a look at an overview of the processes that we're going to integrate:
Authentication
The sandbox's APIs are secured by OAuth2 authentication that provides a JWT (JSON Web Token). It's possible to use a password grant and a client_credentials grant. These tokens expire every 15 minutes, so we'll need to make sure these credentials are refreshed automatically.
TMS shipment to Broker order
The TMS shipments will be pulled periodically from the TMS API and then transformed and delivered to the Broker API.
flowchart TD
A@{ shape: circle, label: "start" } --> B
B@{ shape: rect, label: "get new shipments" } --> C0
C0@{shape: diam, label: "any \nshipments?"}
		C0 --> |Yes| C
		C0 --> |No| C2@{shape: framed-circle, label: "end"}
subgraph for each shipment
	C@{shape: lean-r, label: "transform to order"} --> D
	D@{shape: rect, label: "post order"} --> E
	E@{shape: rect, label: "log result"}
end
E --> F@{shape: diam, label: "success?"}
		F --> |Yes| G@{shape: framed-circle, label: "end"}
		F --> |No| H@{shape: rect, label: "handle errors"}
- Scheduler starts the process
- Get new shipments from the /tms/shipments endpoint
- Check for shipments in response
- Split shipments payload into a sequence of single shipments (for each)
- Perform a data mapping to the broker format
- Create the order with the /broker/order endpoint
- Log the result
- Check the aggregated results for errors and handle if necessary.
Broker event to TMS event
The broker events are sent to a webhook which will transform and deliver them to the TMS API:
flowchart TD
A@{ shape: circle, label: "start" } --> B
B@{ shape: rect, label: "check api key" } --> C
C@{shape: diam, label: "valid?"}
		C --> |Yes| D
		C --> |No| E@{shape: rect, label: "return HTTP 401"}
D@{shape: lean-r, label: "transform to tms event"} --> F
F@{shape: rect, label: "post event"} --> G
G@{shape: diam, label: "success?"}
		G --> |Yes| H@{shape: framed-circle, label: "End"}
		G --> |No| I@{shape: rect, label: "handle errors"}
- Inbound HTTP message starts the process
- The incoming webhook API token is validated.
X-API-KEY - Perform a data mapping to the tms format
- Create the event with the tms/event/shipment_id endpoint
- Log the result
Integrating with n8n
Now that we have laid our groundwork we can actually start integrating. If you want to follow along, you can register for a free trial or use the docker installation. For readers going the docker route I have an example docker-compose file that will spin up n8n and the sandbox:
Click to view docker-compose.yaml.
services:
  n8n:
    image: docker.n8n.io/n8nio/n8n
    ports:
      - 5678:5678
    networks:
    - n8n
    volumes:
      - n8n_data:/home/node/.n8n
    environment:
      # Adjust to your timezone
      - GENERIC_TIMEZONE=Europe/Paris
      - TZ=Europe/Paris
      - N8N_ENFORCE_SETTINGS_FILE_PERMISSIONS=true
      - N8N_RUNNERS_ENABLED=true
  sandbox:
    image: atetz/integration-sandbox:v1.0.5
    ports:
      - 8000:8000
    networks:
      - n8n
    env_file:
     # check the github repo for the .env options
      - .env

volumes:
  n8n_data:

networks:
   # Creates a shared network named n8n. This way the n8n and sandbox containers can communicate with each other
  n8n: {}
A quick overview
During my exploration of n8n I found the official docs to be the best starting point to quickly get started. If you have some experience in the integration field already, I think you should manage just fine reading the core concepts and cherry-pick content as you go from there on.
On the homescreen users are greeted with 5 main options (depending on the version / license):
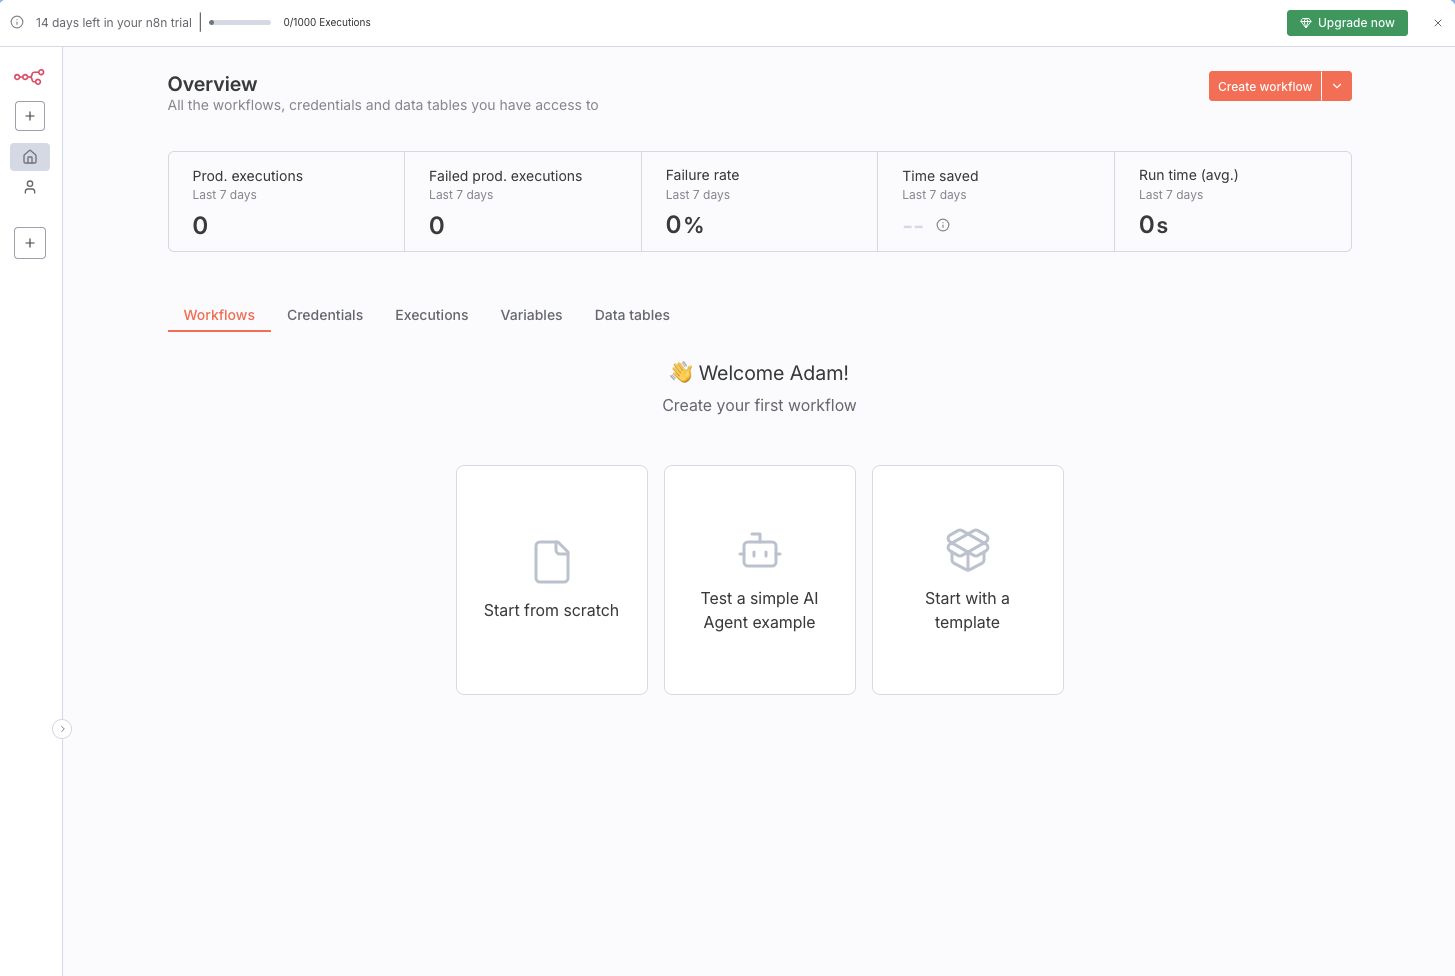
- Workflows - an overview of the workflows. Workflows are the heart of n8n it's the place where users orchestrate the nodes that are necessary to automate a process;
- Credentials - used for creating, managing, and sharing credentials;
- Executions - a detailed log overview of all executions per workflow;
- Variables - a place to manage global variables that can be accessed from any workflow;
- Data tables- a place to create data tables that let you create, read, update and delete data in tabular format from any workflow.
There are also some less visually prominent options that take you to the admin panel, let you use templates (predefined workflows), open the help page or let you view insights.
Data structure and flow
Each node receives and processes data in an array of json objects. The output of the first node is the input of the second node and so on. Except the very first node that serves as a trigger node (like a scheduler or webhook). This node only produces an output based on the trigger settings.
By default nodes will process an array of multiple items for each item. So for example if the node receives an array of multiple shipments to work with:
[{ "shipment": 1 }, { "shipment": 2 }, { "shipment": 3 }]The node will be executed per shipment. There are some exceptions to this rule depending on the node or configuration.
Even for non json data, the object that is passed is wrapped in json. To illustrate this n8n uses the following example in their docs:
[
	{
		// For most data:
		// Wrap each item in another object, with the key 'json'
		"json": {
			// Example data
			"apple": "beets",
			"carrot": {
				"dill": 1
			}
		},
		// For binary data:
		// Wrap each item in another object, with the key 'binary'
		"binary": {
			// Example data
			"apple-picture": {
				"data": "....", // Base64 encoded binary data (required)
				"mimeType": "image/png", // Best practice to set if possible (optional)
				"fileExtension": "png", // Best practice to set if possible (optional)
				"fileName": "example.png", // Best practice to set if possible (optional)
			}
		}
	},
]
source: https://docs.n8n.io/data/data-structure/
Setting up authentication and working with OAuth challenges
At the start of my test I quickly found out that my sandbox's OAuth password grant is not supported. There were only options for Authorization Code, Client Credentials or PKCE.
Since I implemented the basic OAuth2 example from the FastAPI documentation I wondered why. After doing some digging in the community resources I found the answer on their discord: "The password grant type is legacy and not part of OAuth 2.1 which is what we support".
Ah too bad! But how hard can it be to implement this myself? I have done it before!
The easiest way to implement this is by refreshing the JWT on a schedule. Which means that I only need a place to store and update my JWT. Also I thought, going this route introduced two more challenges:
- The pro trial I signed up for is limited to 1000 executions. If I want to refresh my JWT on a 10-15 min schedule then I would use up ~100-150 executions a day for just refreshing my credentials!
- I didn't really find an out of the box option to update a variable that is accessible from another flow.
The pro variable feature only let's users edit the variable data from outside the workflow. I had to either use a community node, data tables, database or some other external source like a key value store. Another option I found was that I could build a sub workflow that checks and refreshes the token with the help of the workflowStaticData feature. I could then use this sub flow every time before a post to my sandbox.
All of those options sounded a bit over-engineered to me for something so simple as storing rotating credentials. So I decided to upgrade my sandbox and make it compatible with the OAuth 2.1 client credentials grant. Which boiled down to adding alias field names for username and password. Namely client_id and client_secret. And adding support for getting the token with Basic Authentication in addition to the x-www-form-urlencoded. This is by no means a great implementation of OAuth, but for testing purposes it gets the job done and lets us use the builtin functionality.
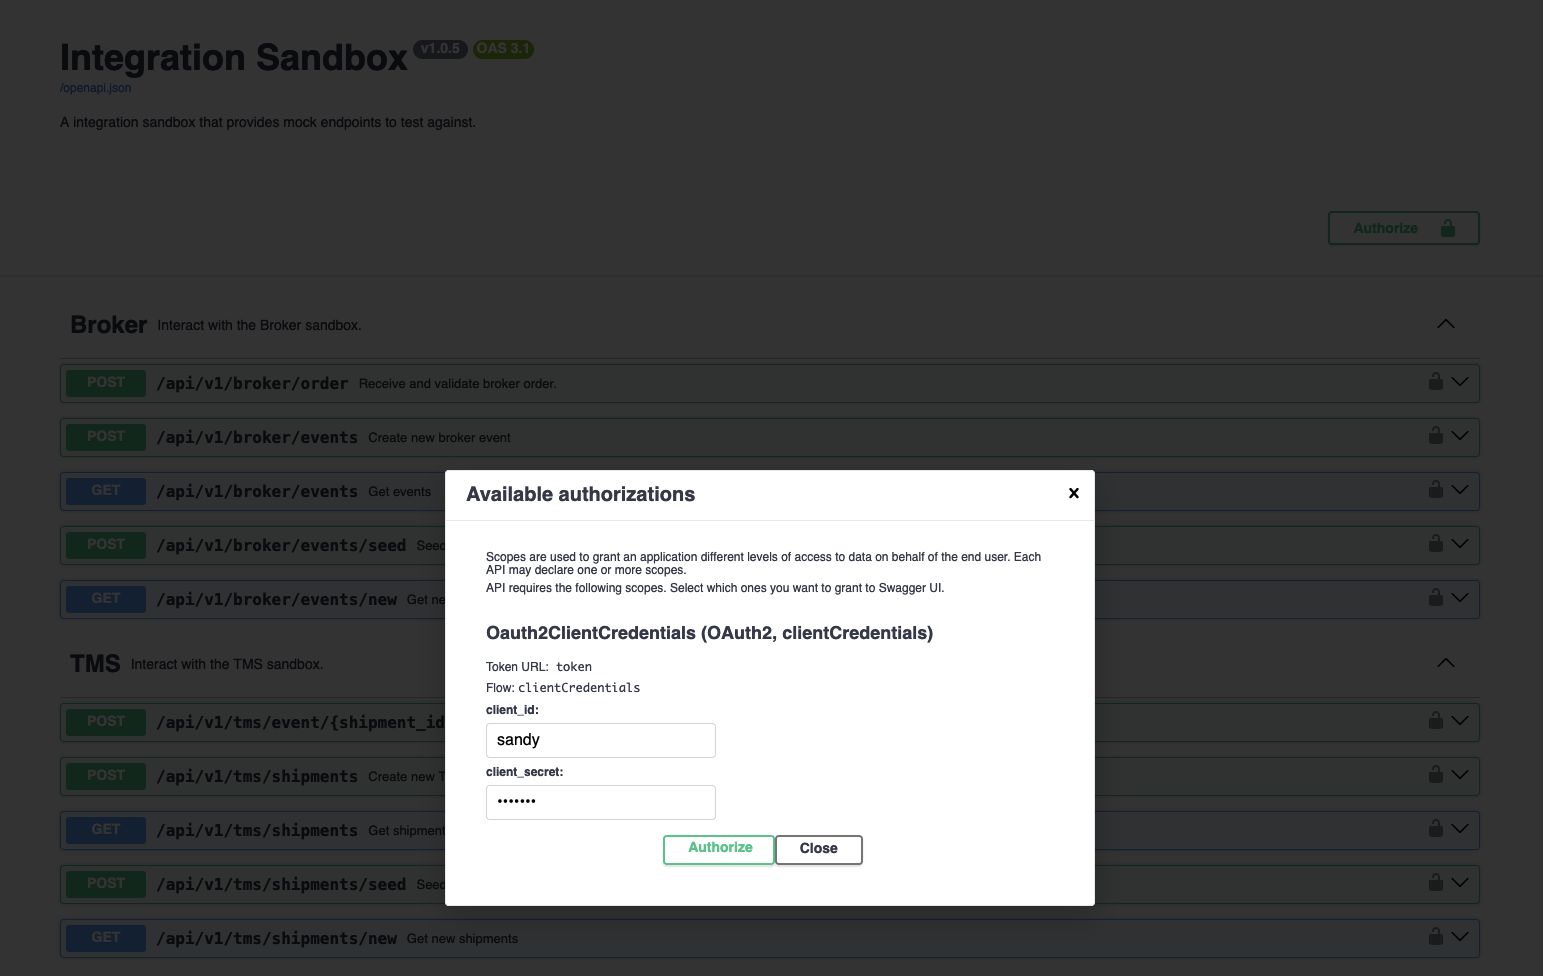
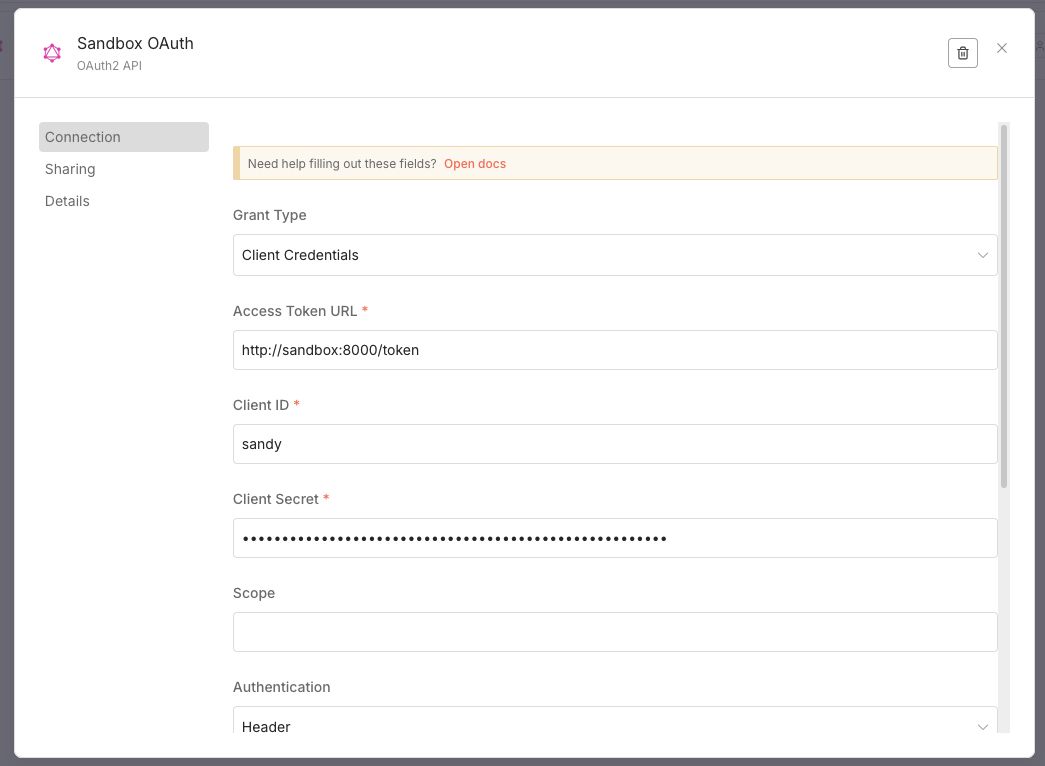
With the new functionality in the sandbox, setting up the authentication was very easy:
-
I created an OAuth2 API credential and filled in the form with the correct details.
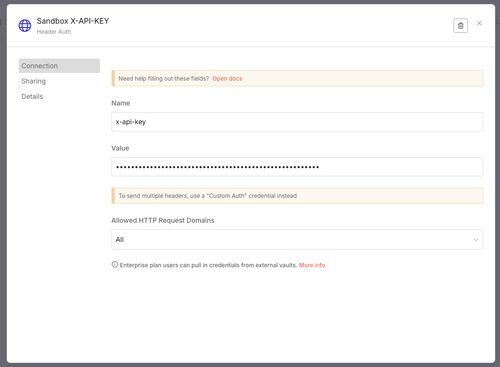
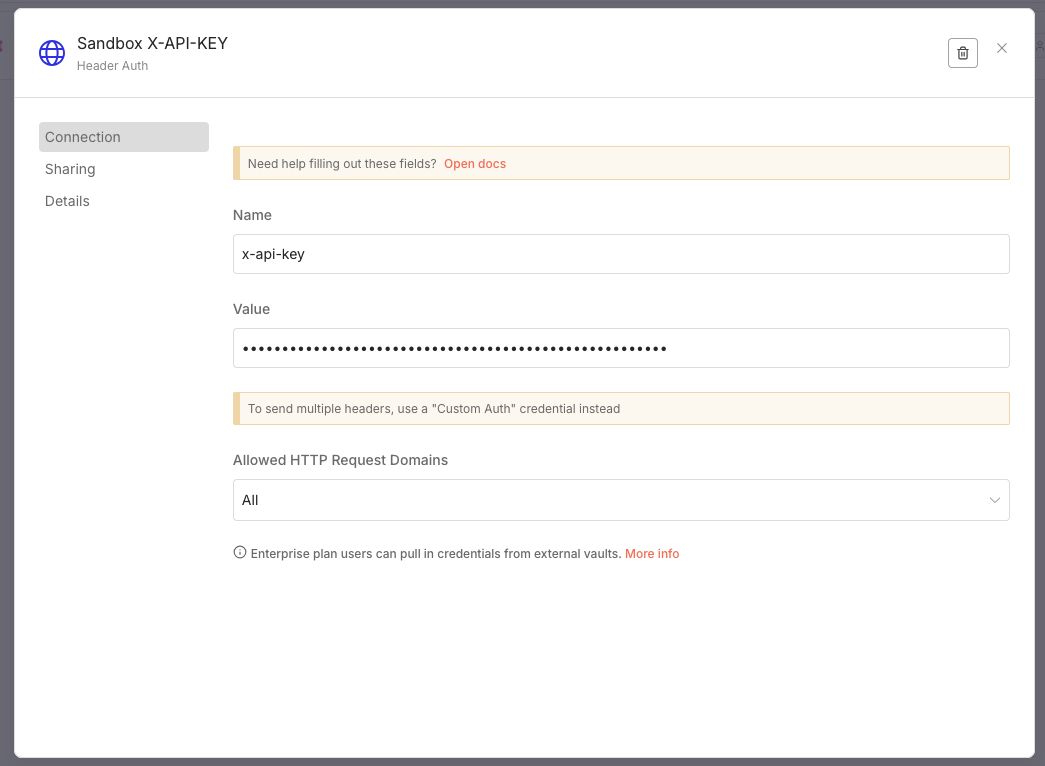
-
I added the X-API-KEY as a Header Auth credential that is used to secure the incoming webhook connections
Click to open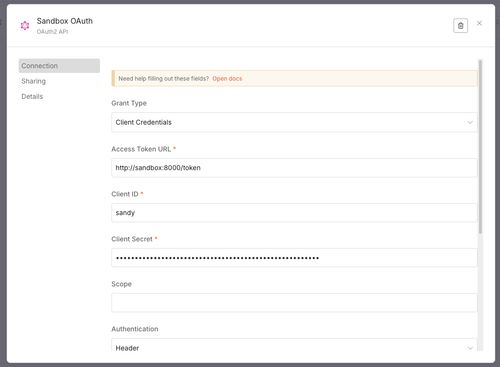
Building the TMS shipment to Broker order workflow
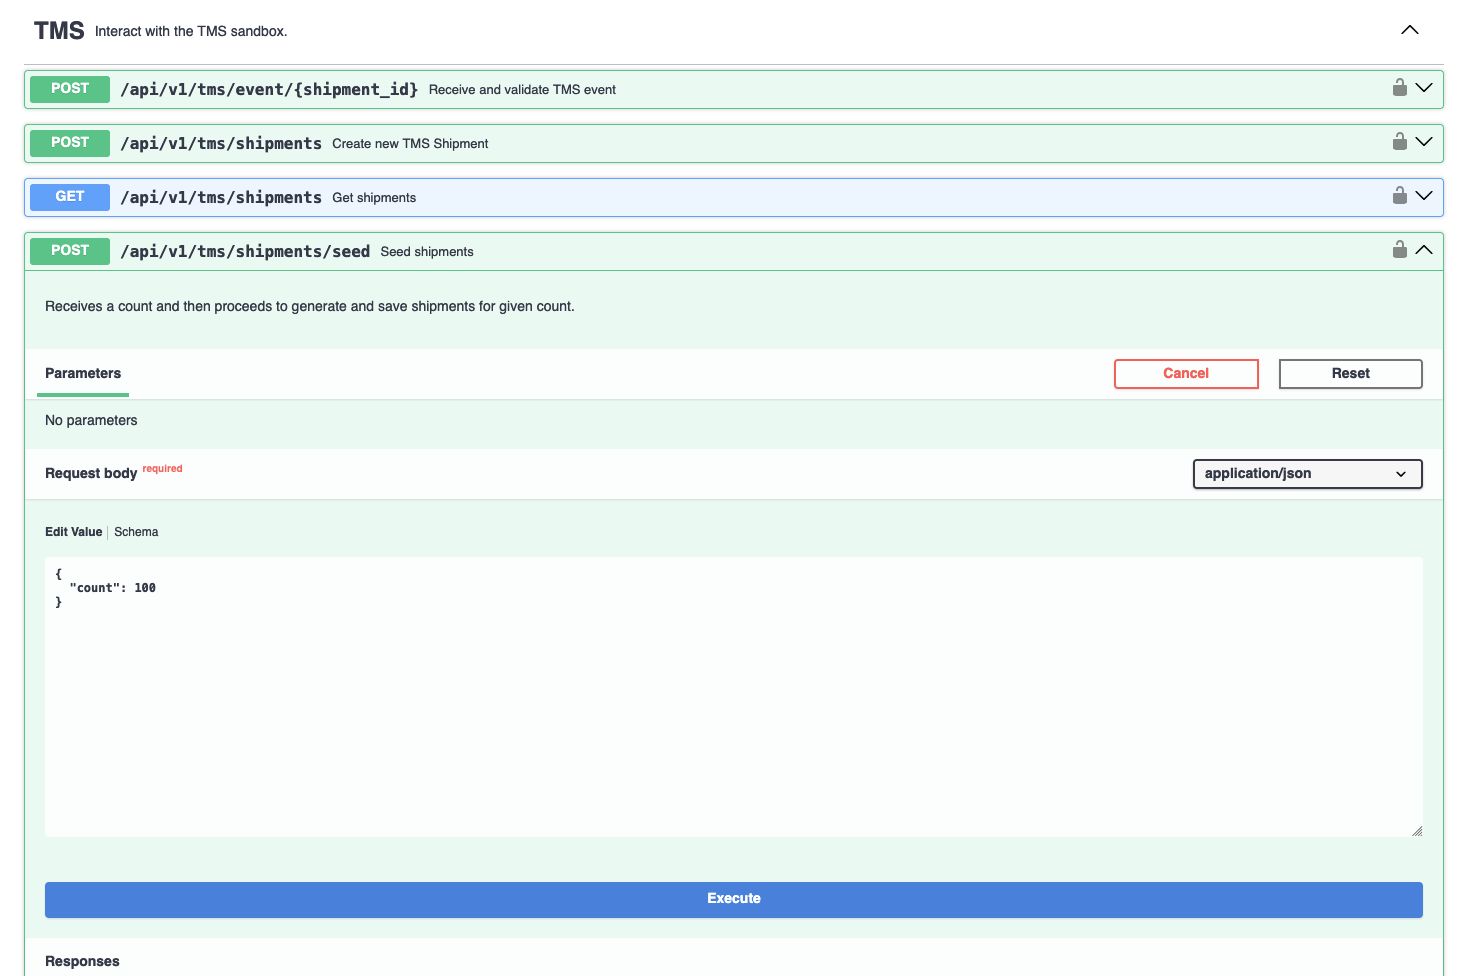
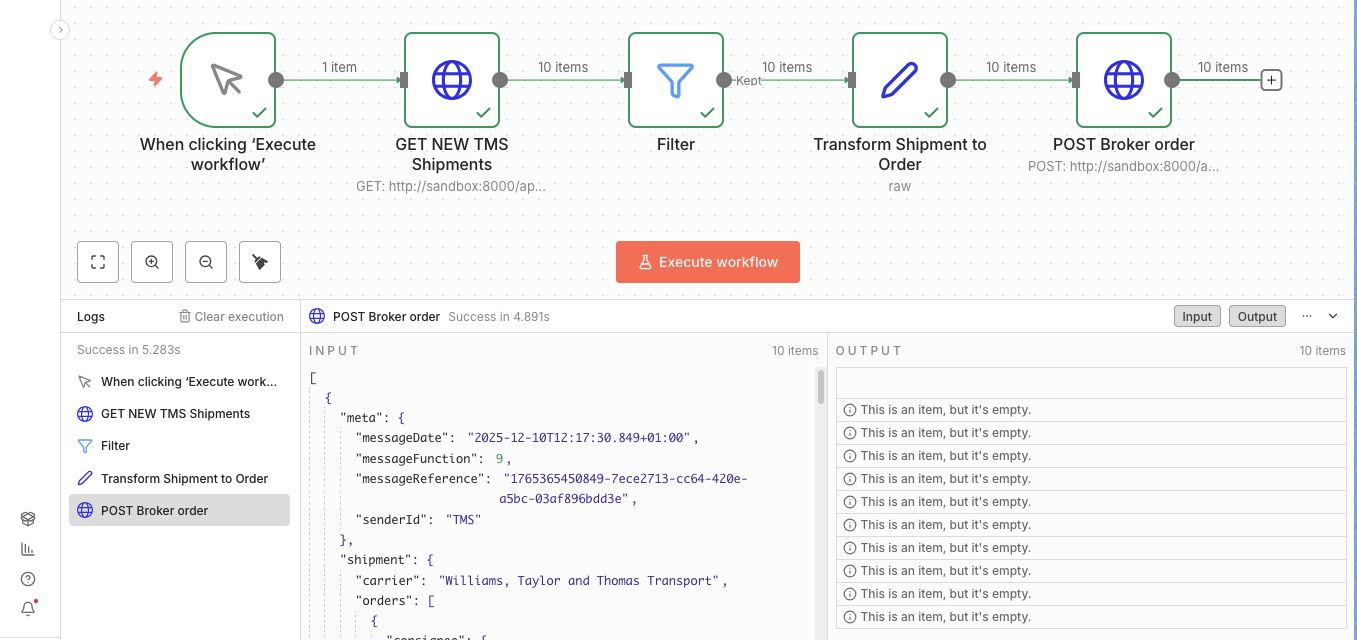
After seeding 100 new shipments in the sandbox, I created a workflow called new tms shipment to broker order.
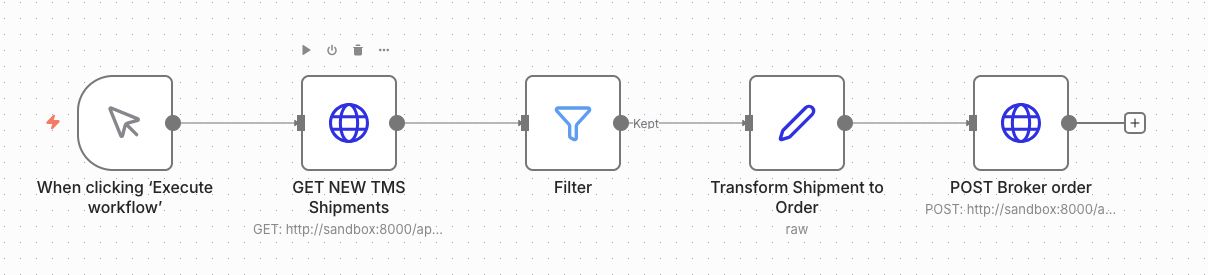
The workflow starts with a When clicking 'Execute workflow' trigger. Which means that the workflow will trigger as soon as the Execute workflow button is pressed. This is an ideal way to develop and test the workflow quickly.
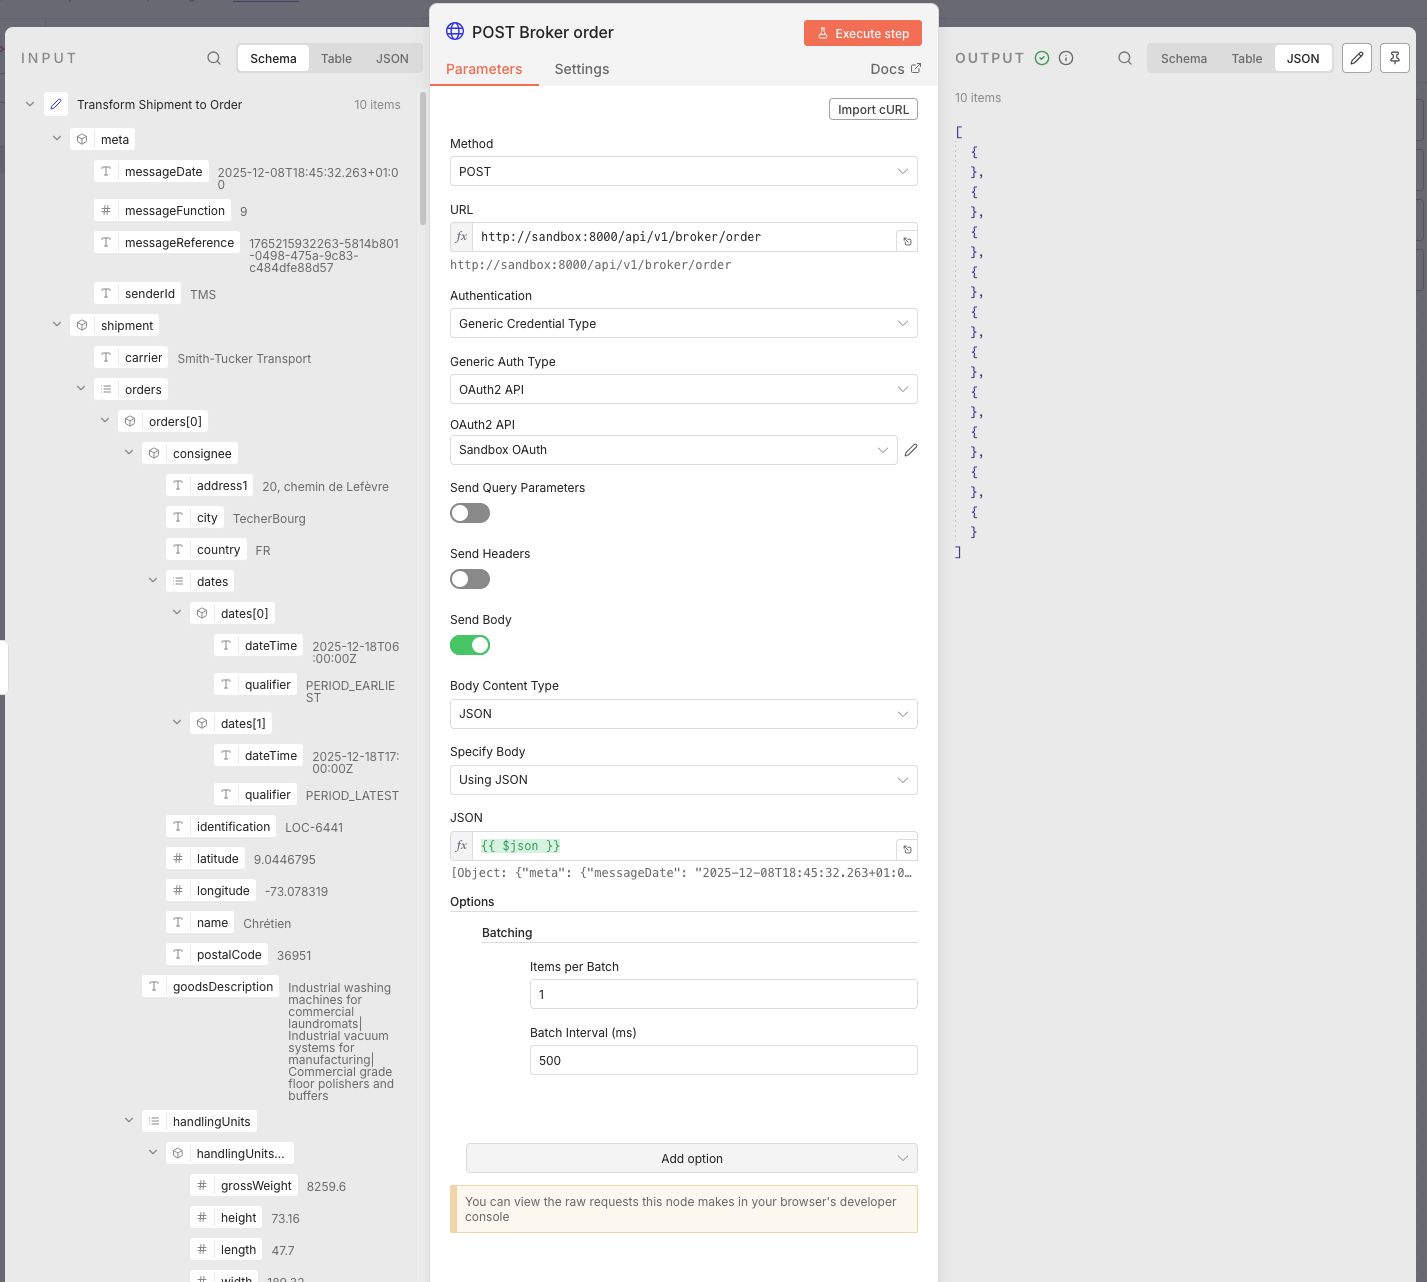
Next I added a HTTP Request node that will get the new shipments from the API. The details of a node open a screen showing the input and output that passes through which gives a clear image of what's going on with the data. There's also a Execute step button that will populate the input and output if there's cached data available. I like this idea a lot!
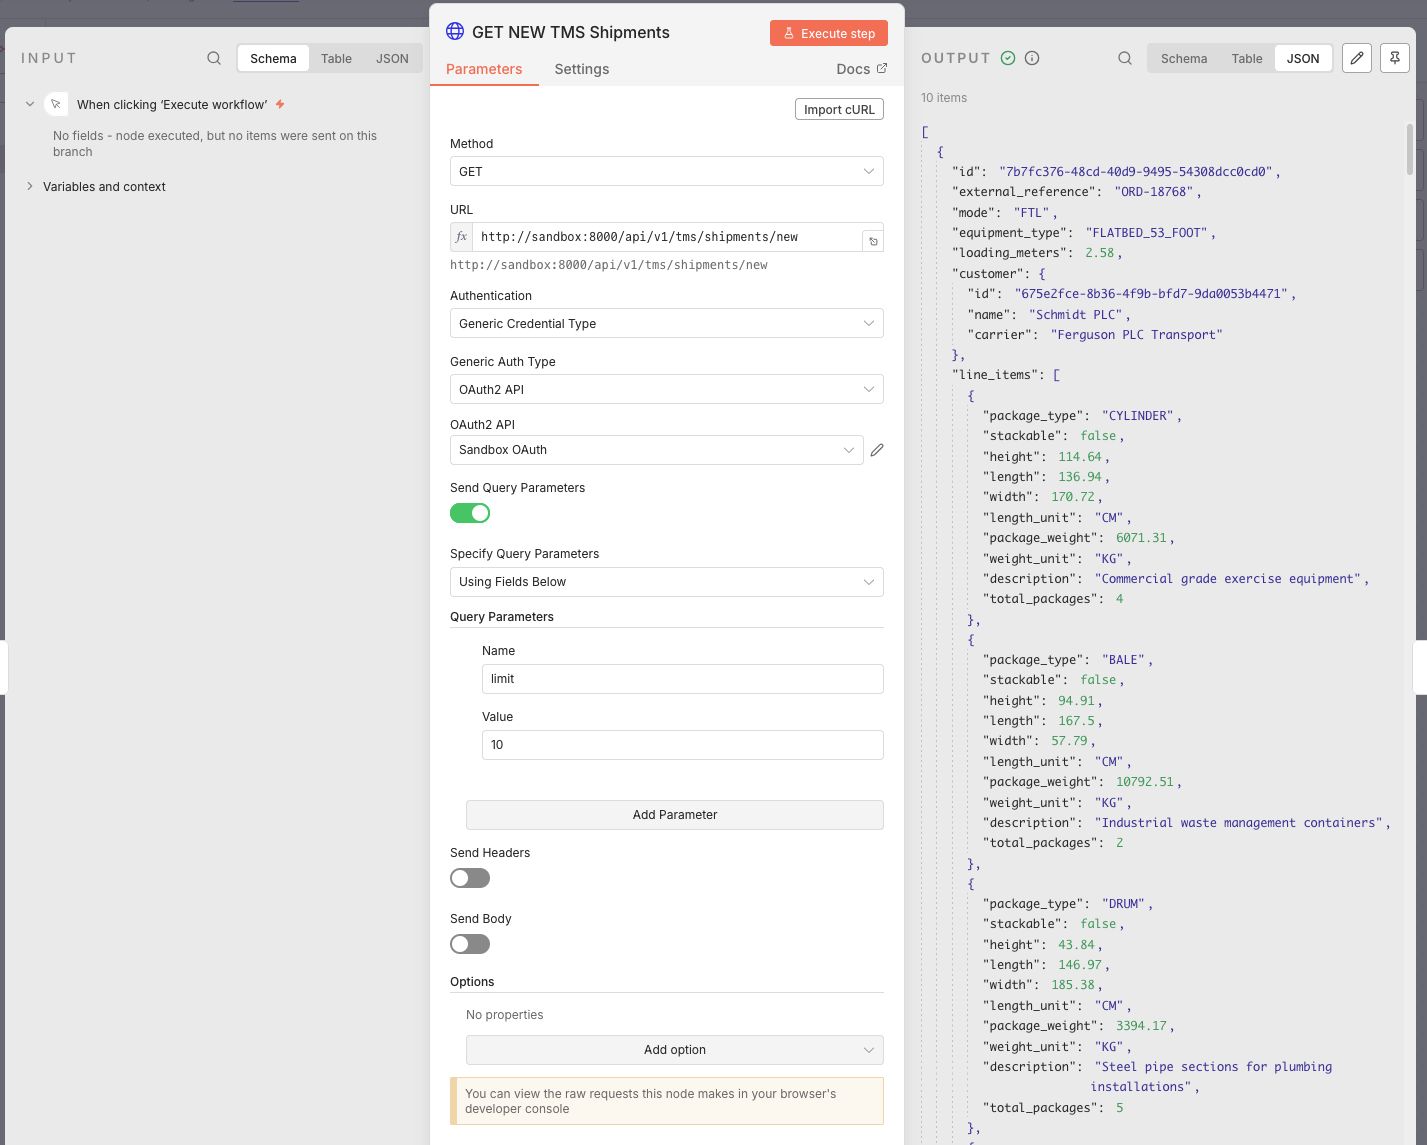
In the above image I've set the method, URL and authentication. The authentication details were already available in the dropdown menu because I setup the OAuth credentials. I also added a query parameter limit with the value of 10 that let's me only process 10 shipments per each test. Which means I can test 10 times before seeding new shipments.
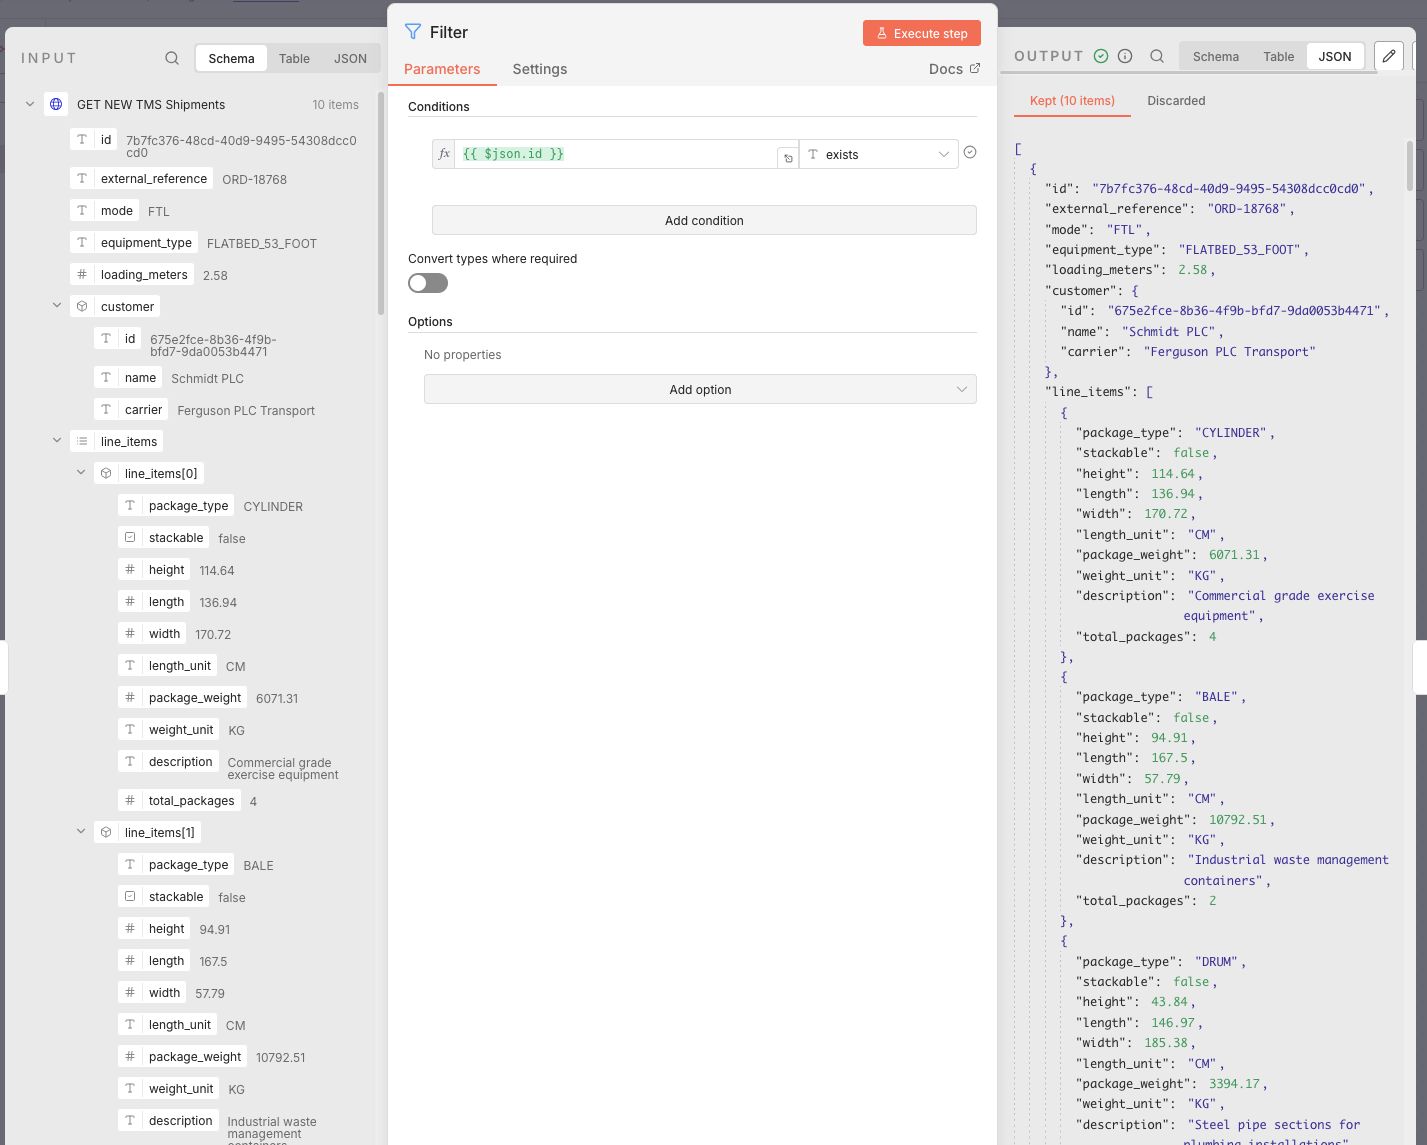
After the HTTP Request node I added a Filter node and set a condition that checks if {{ $json.id }} exists. This prevents the workflow from processing an empty list of items by checking if there is an id field in the input. If the array is empty, the first item won't have an ID and stop the flow.
Data mapping
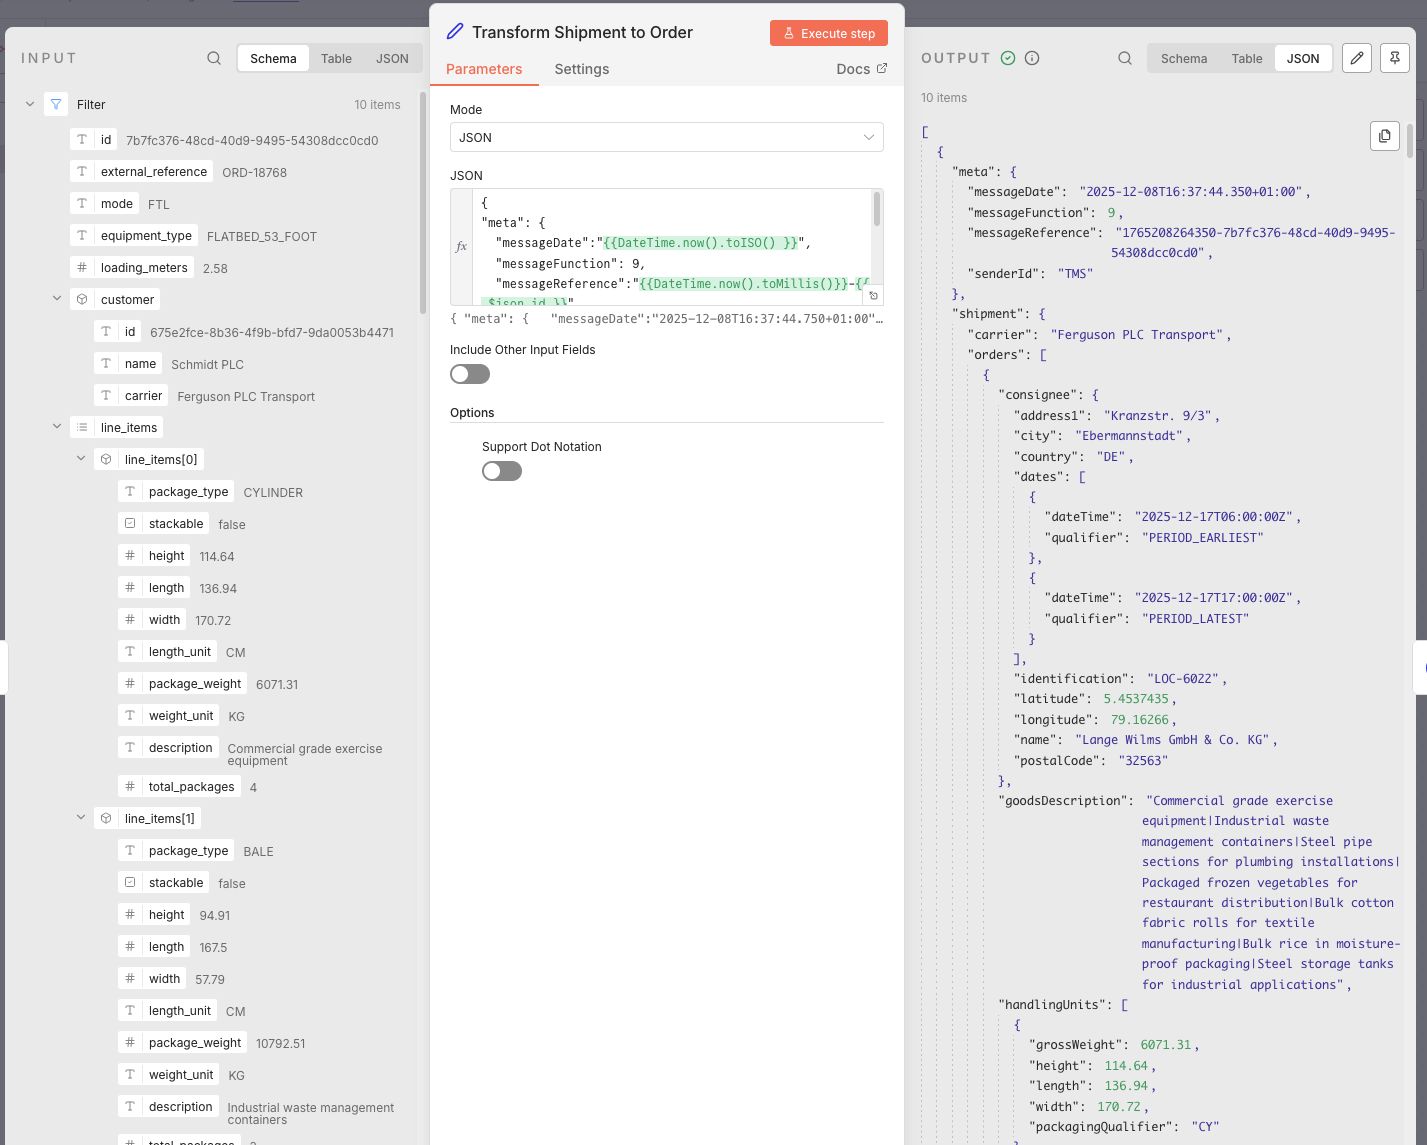
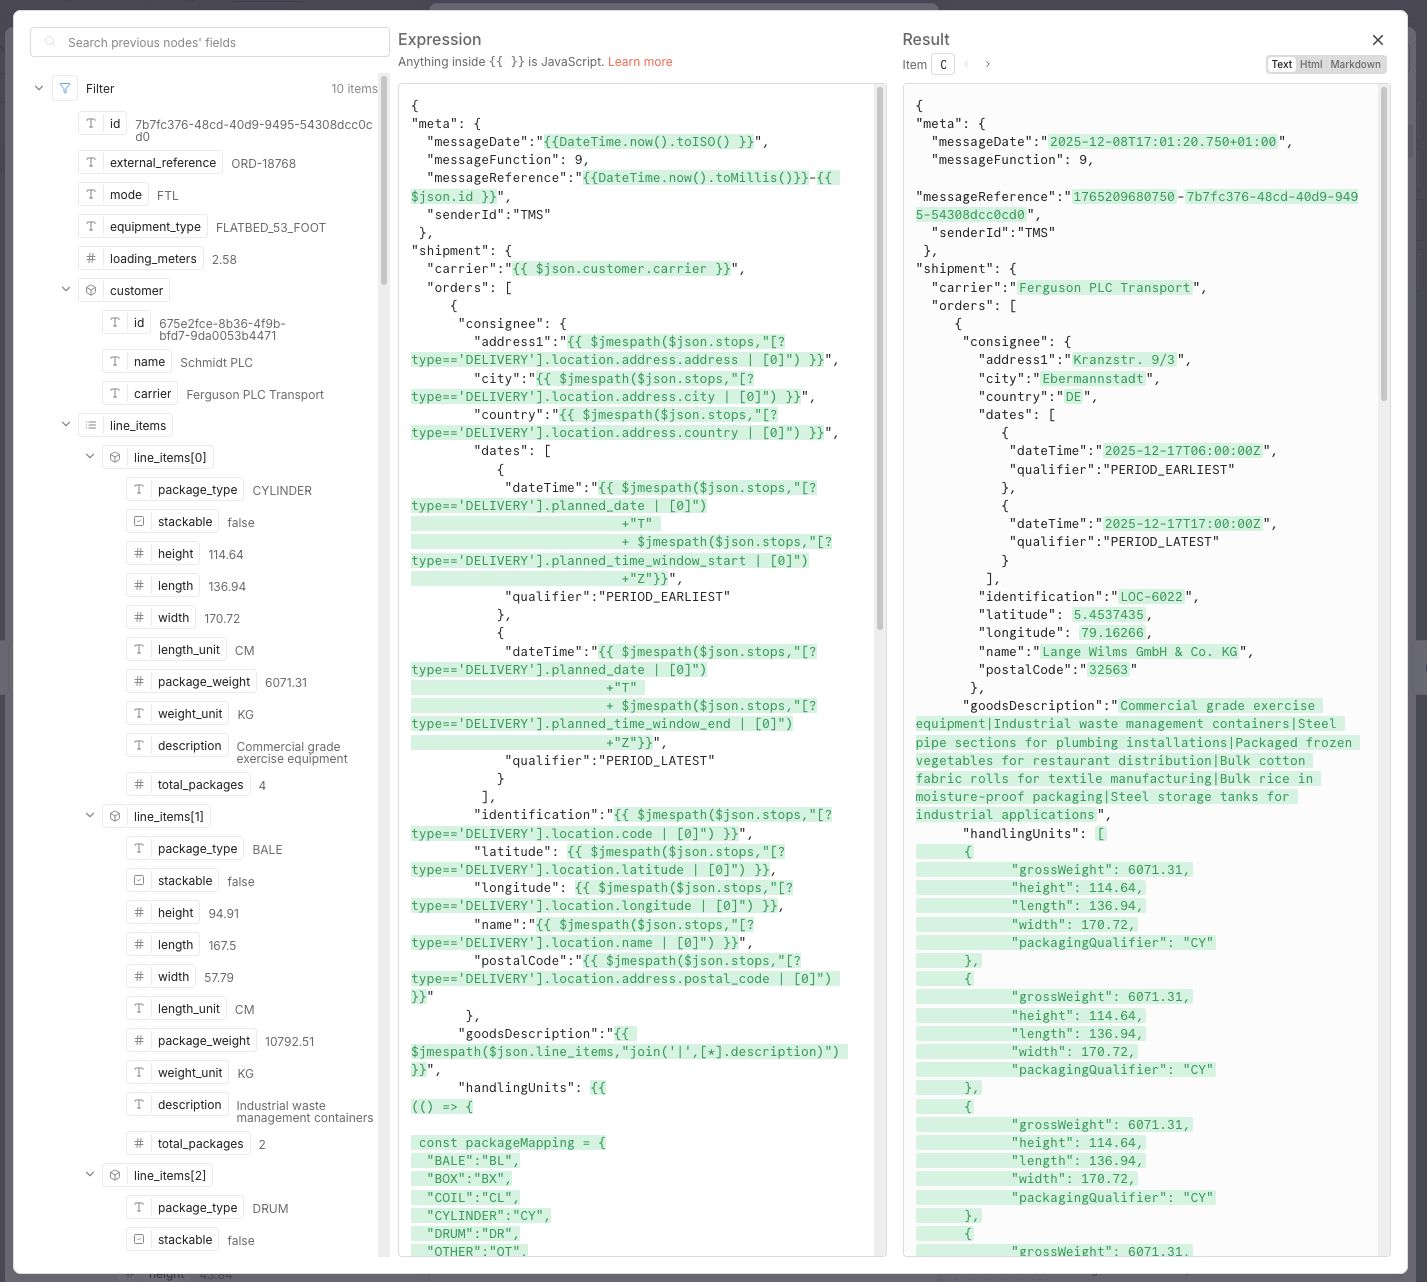
The next node is Edit Fields. This node is used to define the data mapping from the TMS to the broker payload. And this is where things start to get really interesting.
The settings of this node has two main modes:
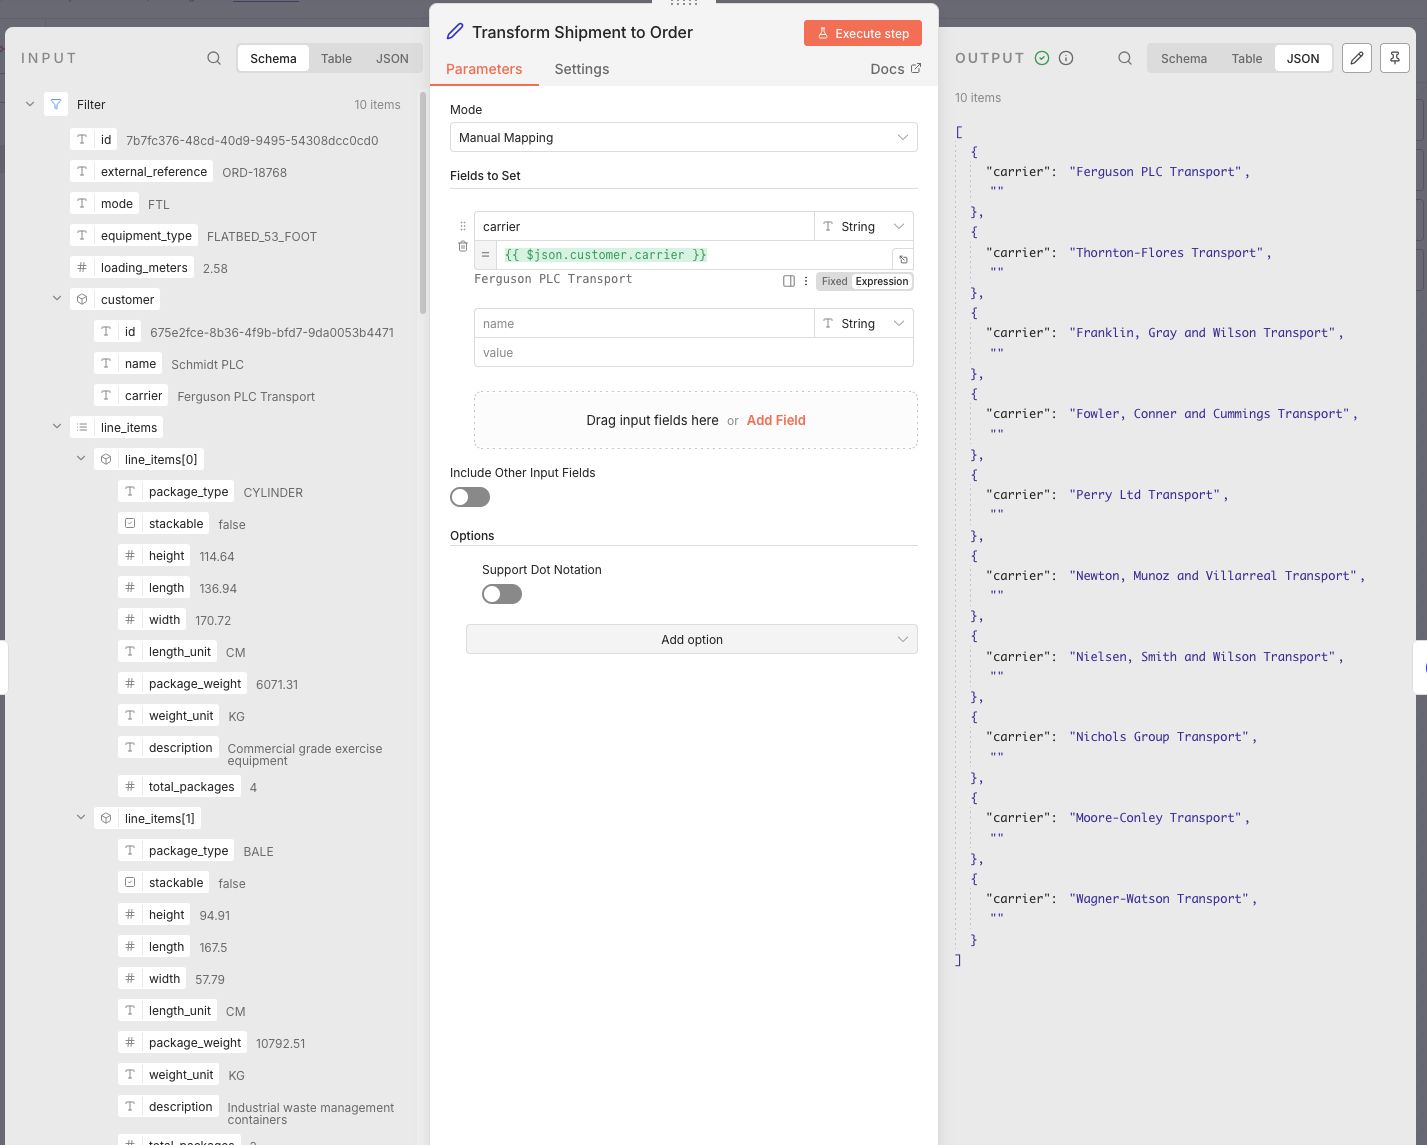
- Manual mapping
- JSON
The manual mapping mode lets users define the output message structure with a drag and drop interface. Users can drag and drop complete fields from left to right and finetune them, or define fields manually and then fill them with fixed data or data from an expression. An expression can be either dot notation, JMESPath or JavaScript. Dragging a field from the left will automatically use dot notation.
The JSON mode gives users a similar experience to a templating engine where the payload can be defined in plain text in combination with expressions.
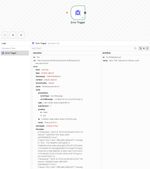
I chose to go the JSON mode route because there is an example of the expected output available in the mapping requirements, which meant I could paste in the json and build out the mapping by templating and testing each field immediately. The requirements also determine a rule for un-nesting aggregated line_items to individual handlingUnits. To get this working I wrote a JavaScript expression that returns the custom array. I shamelessly admit that I switched to a small project in VSCode to write and debug this part.
The end result of the data mapping does the following:
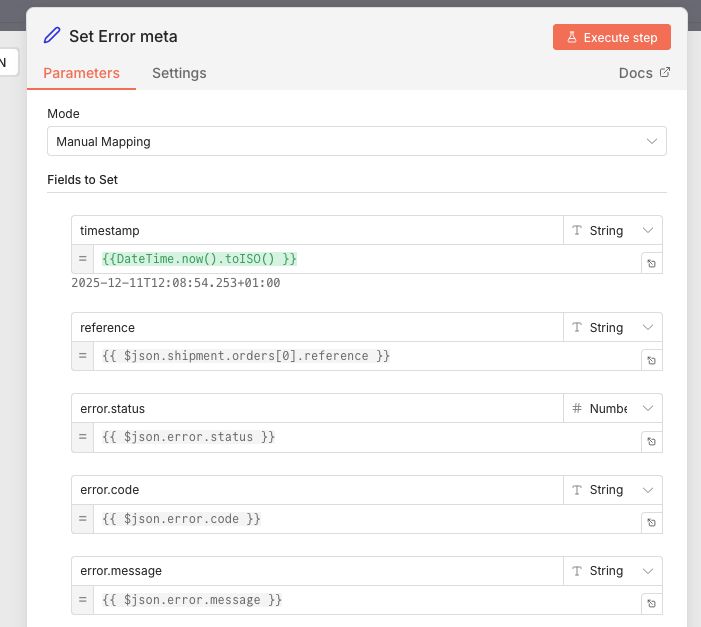
- Generate message metadata
- Set messageDate to current timestamp with
"messageDate":"{{DateTime.now().toISO() }}", - Set custom messageReference with
"messageReference":"{{DateTime.now().toMillis()}}-{{ $json.id }}" - Add fixed senderId and messageFunction.
- Set messageDate to current timestamp with
- Stops to separate pickUp and consignee objects
- Split the stops array into separate pickUp and consignee objects based on the type field (PICKUP vs DELIVERY).
- This is done using a JMESpath filter
$json.stops,"[?type=='DELIVERY'] - For example:
"address1":"{{ $jmespath($json.stops,"[?type=='DELIVERY'].location.address.address | [0]") }}"
- Concatenate goods descriptions
- Join all line_item descriptions with a pipe separator into a single goodsDescription field.
{{ $jmespath($json.line_items,"join('|',[*].description)") }}
- Join all line_item descriptions with a pipe separator into a single goodsDescription field.
- Un-nest line items to handling units
- Each line_item gets replicated by its total_packages count. So 3 line items with 4, 1, and 3 packages become 8 individual handlingUnits.
- Transform TMS package types to broker packagingQualifier.
(() => {
 const packageMapping = {
  "BALE":"BL",
  "BOX":"BX",
  "COIL":"CL",
  "CYLINDER":"CY",
  "DRUM":"DR",
  "OTHER":"OT",
  "PLT":"PL",
  "CRATE":"CR"
 }

 const result = [];
 for (const item of $json.line_items) {
   for (let i = 0; i < item.total_packages; i++) {
     result.push({
       grossWeight: item.package_weight,
       height: item.height,
       length: item.length,
       width: item.width,
       packagingQualifier: packageMapping[item.package_type]
}); - Combine date and time fields
- Merge planned_date with time_window_start/end to create ISO datetime strings
{{
	$jmespath($json.stops,"[?type=='PICKUP'].planned_date | [0]") + "T" +
	$jmespath($json.stops,"[?type=='PICKUP'].planned_time_window_end | [0]") + "Z"
}}- Calculate total gross weight
- Sum the package_weight × total_packages across all line items
- Using a inline JavaScript reduce
{{
Number(
  $json.line_items.reduce(
    (sum, item) => sum + item.package_weight * item.total_packages,
    0
  )
).toFixed(2);
}}
All other fields were mapped using dot notation.
The end result turned out to be quite unreadable at first sight. But it works and debugging is fairly easy in the expression editor. At the same time I can imagine that when you are working in a team with multiple people, there must be some guidelines in place to make these kinds of mappings manageable. In hindsight, it might have been more readable if I had defined the mappings per field in the manual mapping mode.
The last node in the workflow is a HTTP Request node which sends the newly transformed payload to the broker/order endpoint. Because I want the node to send a request per order I set the batching to 1 items per batch with an interval of 500ms.
Et voila! After building and testing the data mapping, executing the workflow results in 10 processed shipments that are validated by the sandbox!
Building the broker event to TMS event workflow
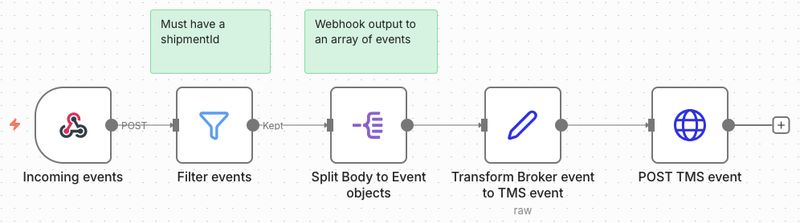
For processing the incoming broker events for the TMS I built the following workflow:
My trial expired during writing this article so I ended up running the workflows with docker.
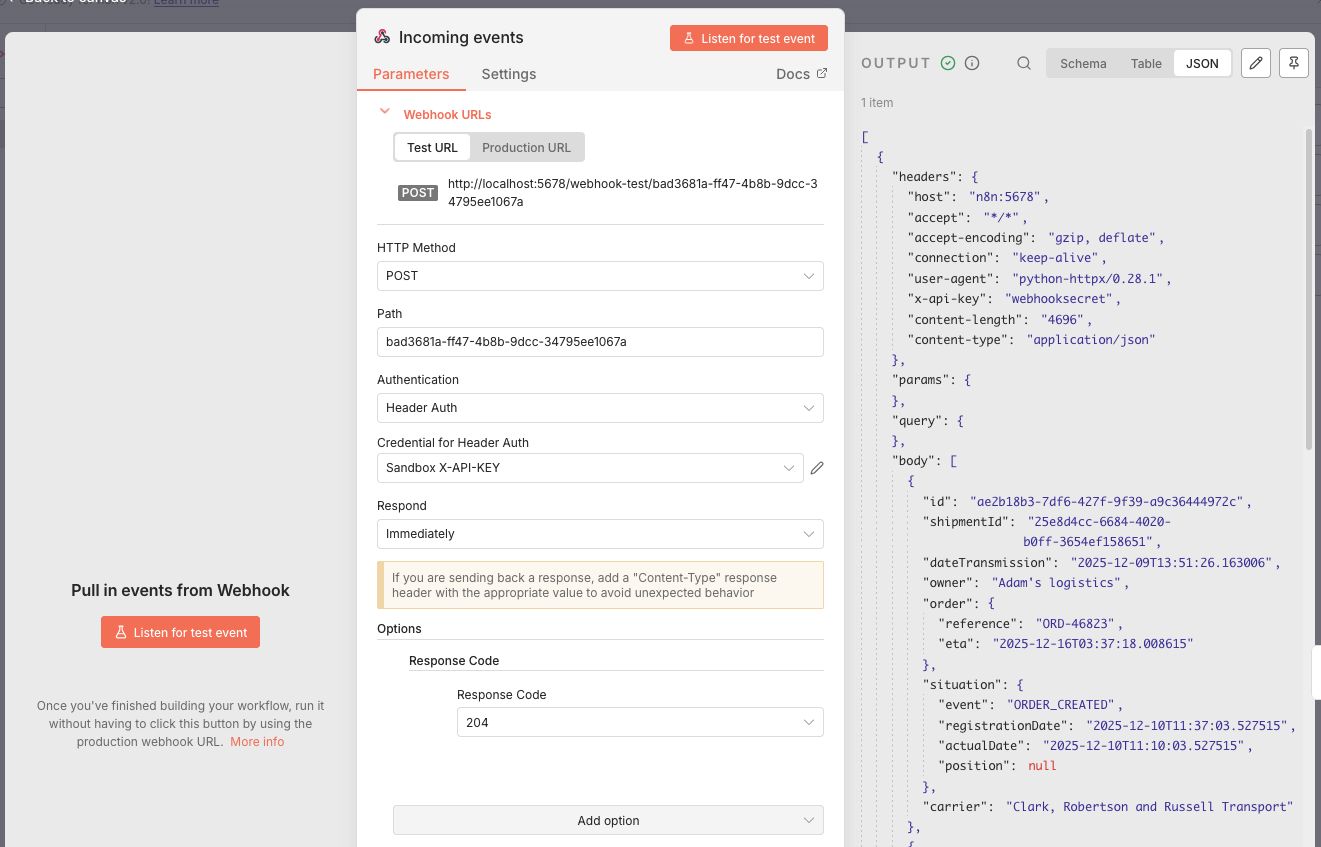
The first node is a Webhook trigger named Incoming events. I configured it to:
- accept the POST http method
- set the Authentication to the Header Auth with the X-API-KEY of the Sandbox
- respond immediately with a HTTP 204.
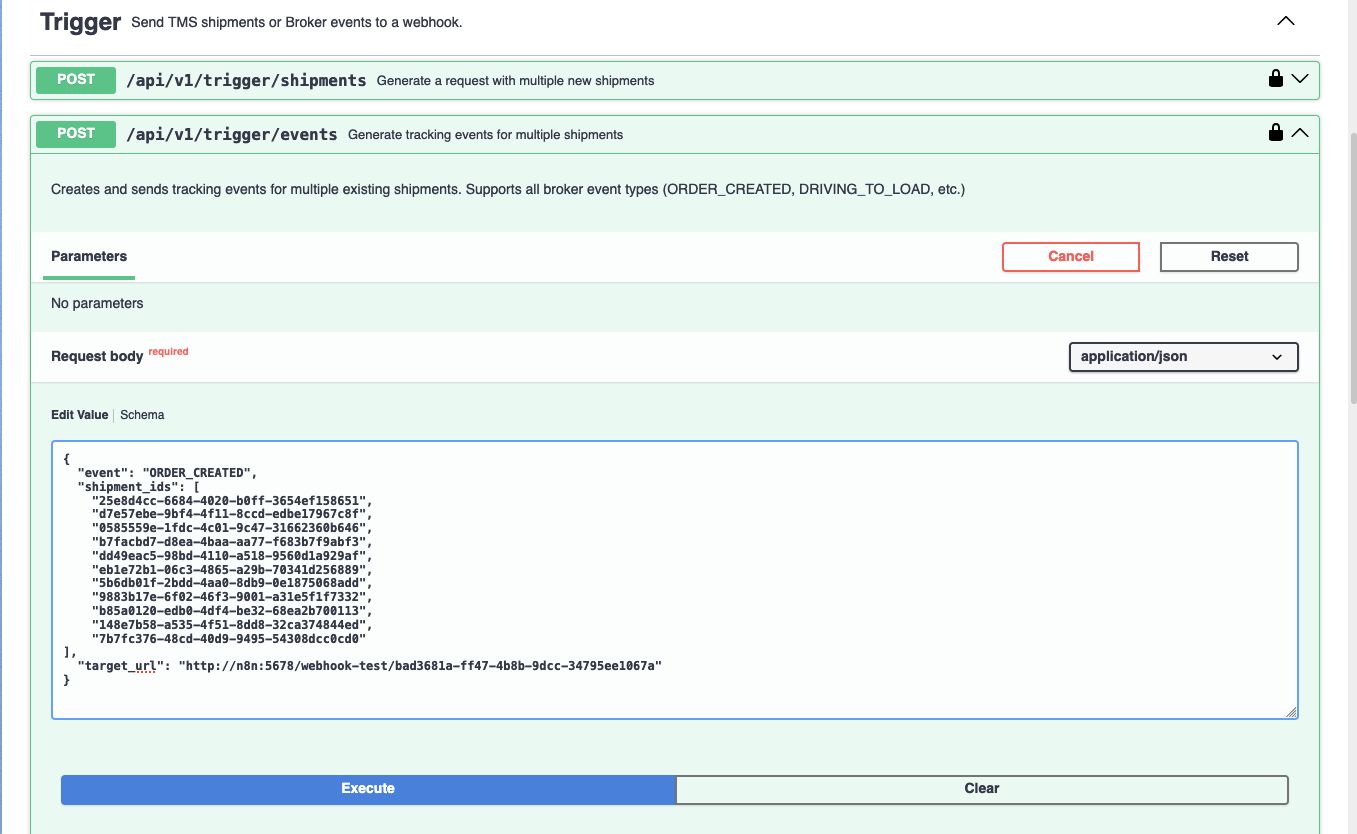
After clicking the Listen for test event button, I triggered a couple of ORDER_CREATED events from the sandbox to the webhook URL.
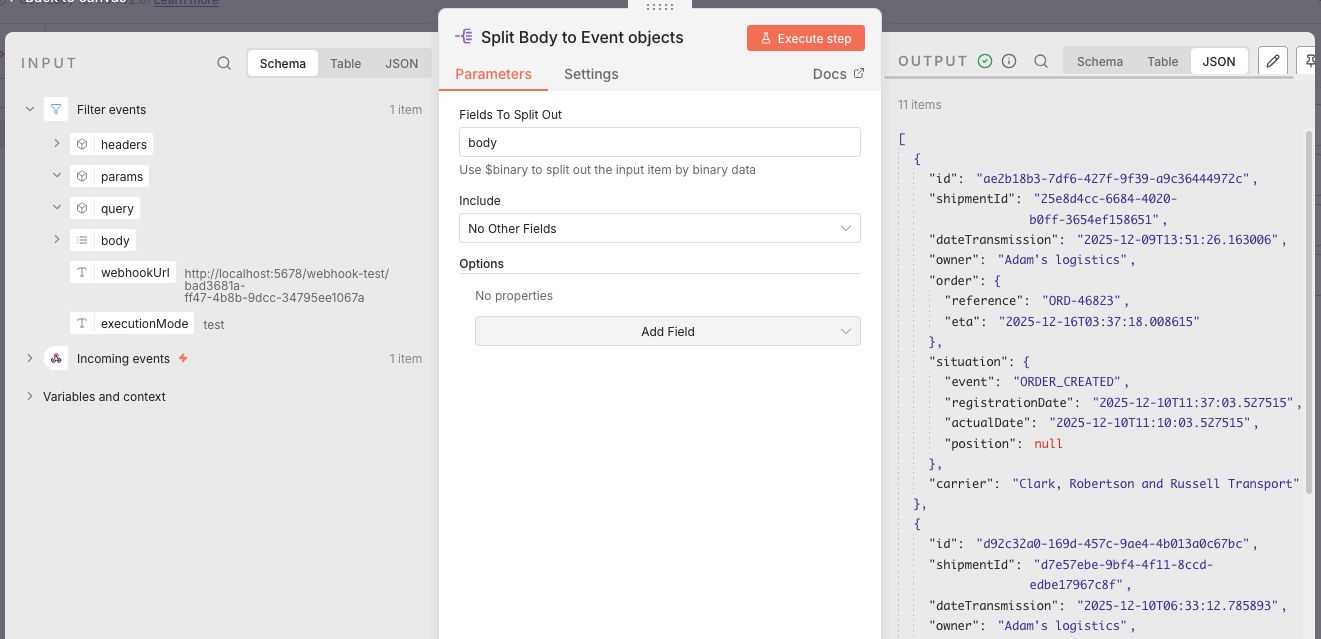
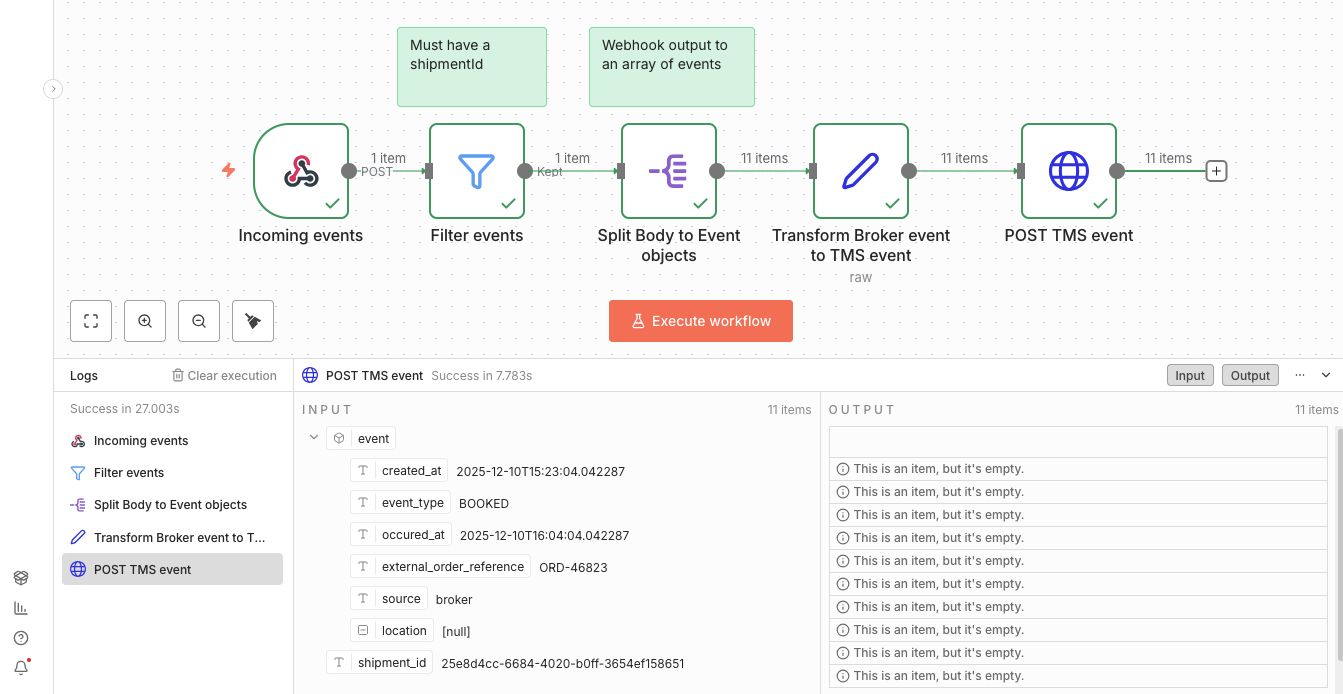
Next up in the workflow is a filter node that prevents empty objects from passing through (just like in the shipments flow). Up until now the json that is passed through nodes is seen as 1 single webhook object which has seperate keys for the incoming headers, params, query and body. To grab the array of events from the incoming message body I added a Split Out and set it to the body field.
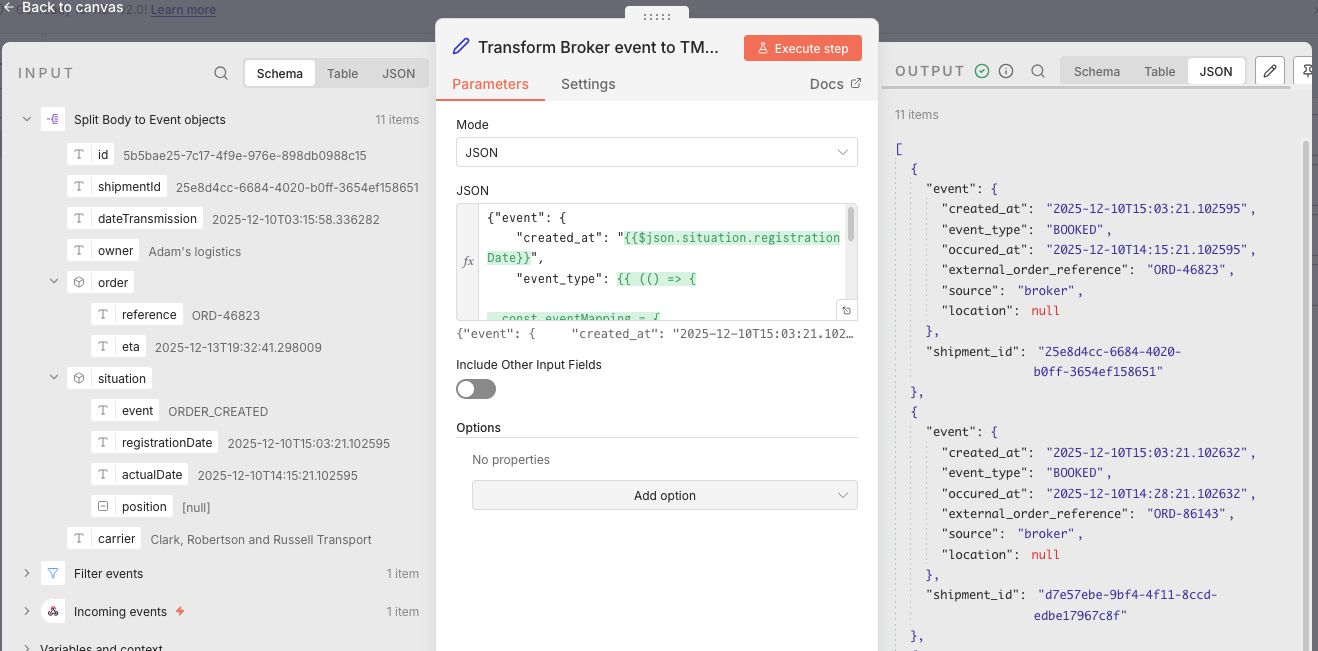
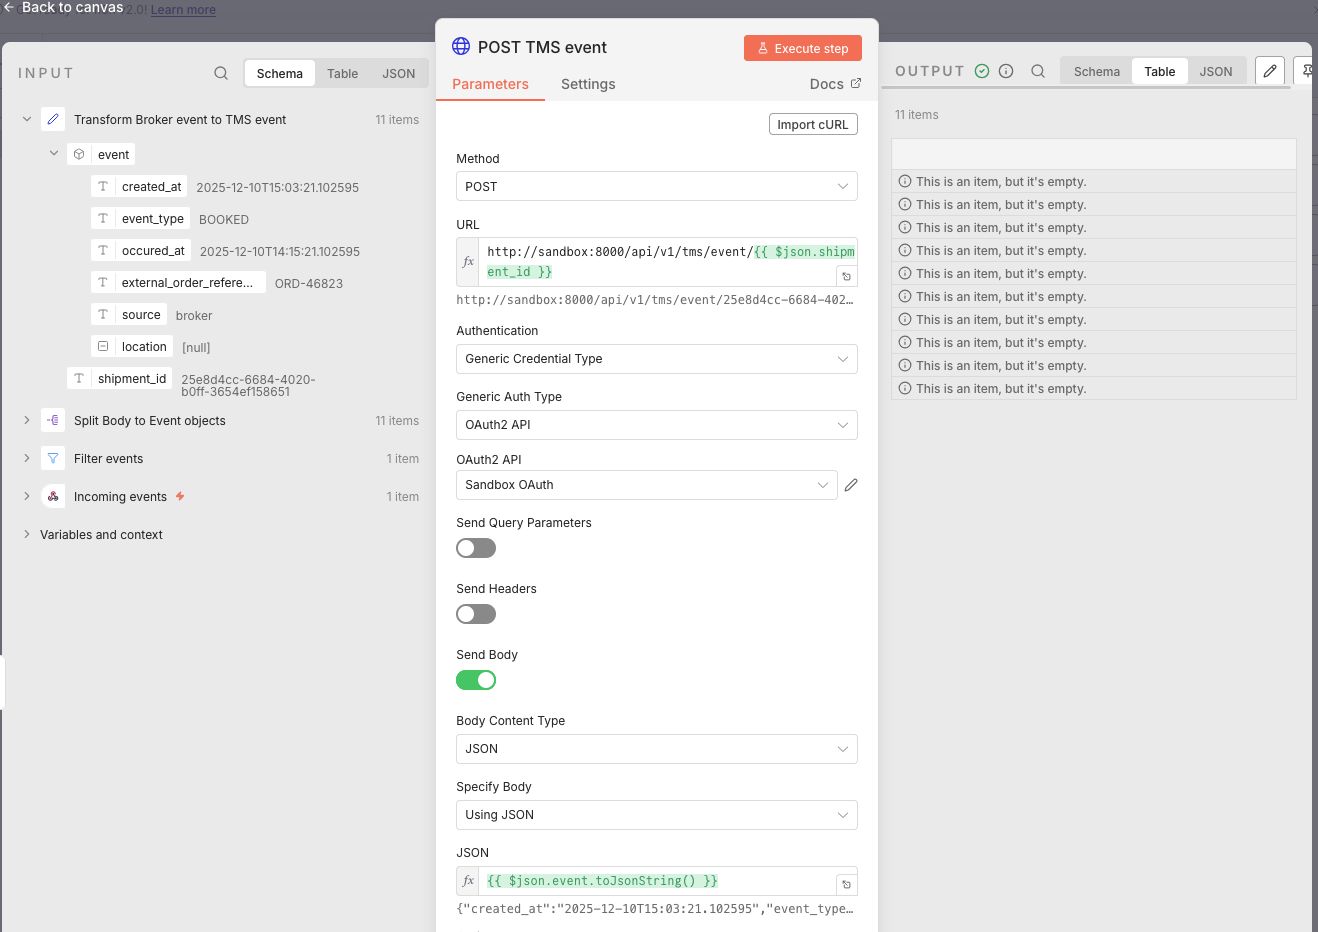
Now that I have an array of events, I can start mapping the broker data to TMS data with an Edit Fields node. This mapping is a lot simpler and uses the same methods as in the shipment flow. Because the TMS event endpoint needs the shipmentId in the URL, I wrapped the event in an object that has the event data and the shipmentId.
Normally I would have stored this in a variable but I could not find a simple way to do this. There is also the option to acces the input of a previous node, which meant I could have accessed the data from before the mapping. But I prefer to work with the current state of the data and therefore added it. I made the end result available here.
Finally a HTTP node at the end sends the event to the TMS event API. The shipment id in the URL is set using dot notation http://sandbox:8000/api/v1/tms/event/{{ $json.shipment_id }} and the json body is defined as {{ $json.event.toJsonString() }}.
Using toJsonString() ensures that the object is correctly transformed to a string. Like JavaScript's JSON.stringify.
After some testing the final result executed perfectly!
Easy peasy! What about Error handling?
Handling what should happen after the process has diverted from the happy flow is a very important aspect of integration. The business needs to be able to trust the automation and when things fail they need to be resolved quickly. Especially when automations grow complexer and handle more and more cases. This is a whole article worthy subject by itself so I wont dive into the details here, but I do have a small example for handling only certain HTTP status codes.
Workflows can throw errors when something goes wrong in a node. Or users can add a Stop and Error node to manually throw an error. The most basic error handling like a retry, stop and fail or continue can be set on the node itself.
It's recommended to build a dedicated Error handling workflow that can do something when an error is triggered. Like for example send a notification when a certain condition is met (without blasting too many notifications). Then from the settings of the main workflow point to that specific Error handling workflow and your centralised error handling is configured. It's also good to know that Error workflow executions are not counted as a production execution in the licensing model.
In some cases we want to handle an error differently. Let say we are sending data to our TMS API. Retrying any HTTP status error code will not be very efficient. If we for example get a HTTP status 422 (Unprocessable content) then a retry of the same content will just result in the same error over and over until the retry limit is reached. But a HTTP 429 (too many requests) might benefit from a delayed retry. Take a look at the example below:
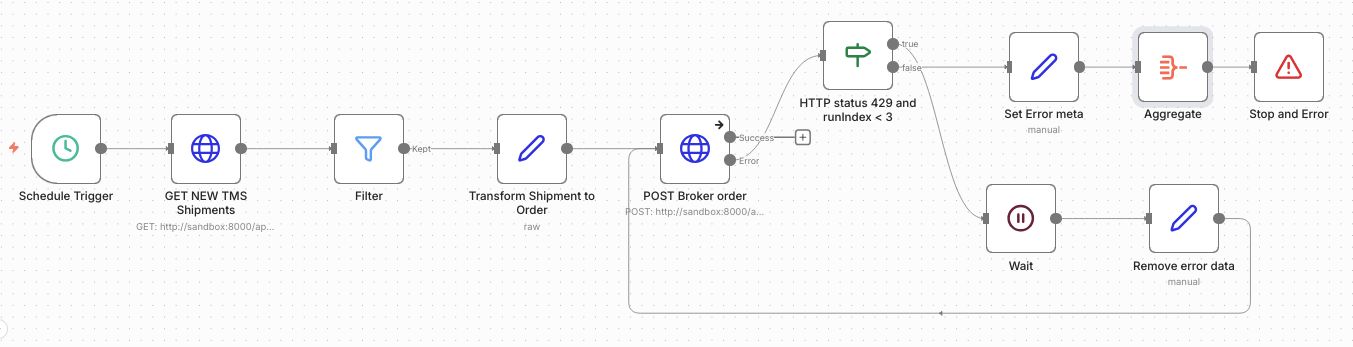
The TMS Shipment to broker order flow has now been extended to handle HTTP 429 status codes differently:
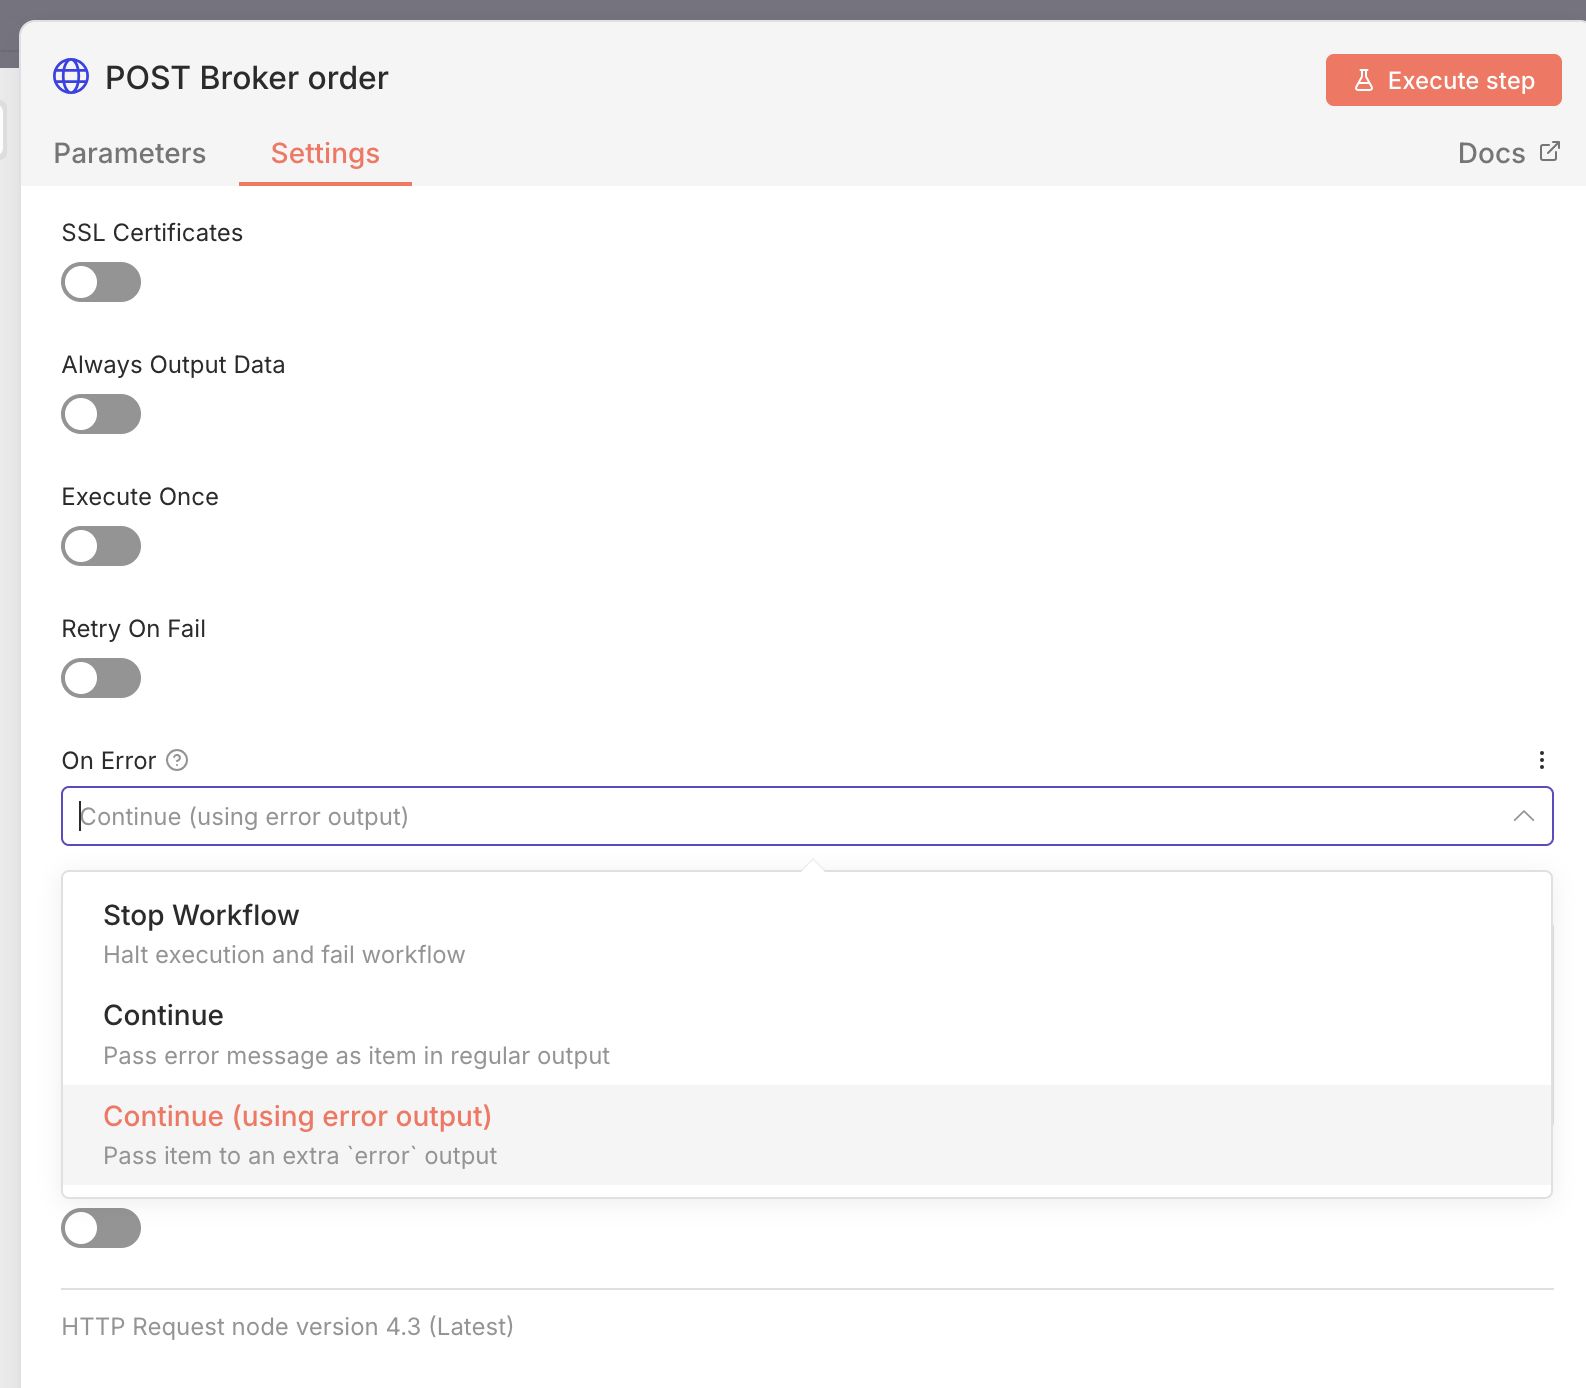
-
The HTTP node On Error setting is set to Continue (using error output).
-
The IF node checks if the HTTP status is 429 AND the runIndex is less than 3. The runIndex is an internal n8n counter that tracks how many times n8n has executed the current node. So this works as a retry count of 3.
-
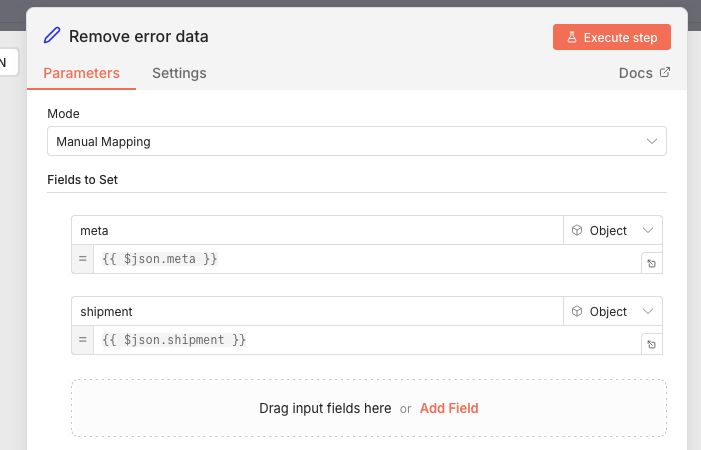
If True, the workflow goes on to a Wait node followed by a Edit Fields node that removes the error the data before going back to the HTTP node to try again.
-
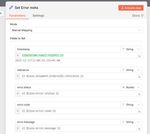
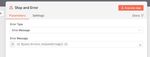
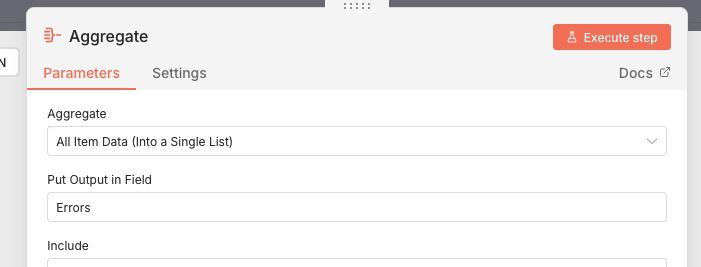
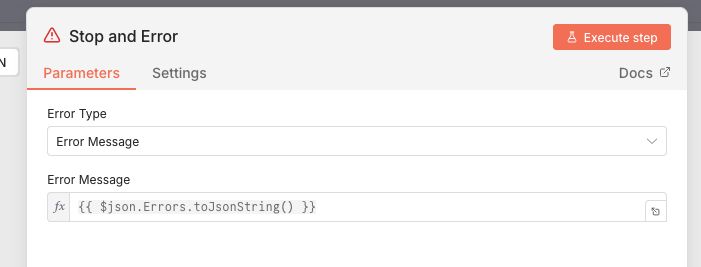
If False, we aggregate the individual shipment errors into 1 message with all the relevant info. This is done by using an Edit fields node to set the data and an Aggregate node to collect all failed messages into 1. Last we throw the error with a Stop and Error node.
-
The Stop and Error node then sends the custom error message of to the Error workflow.
Click to open


Wrapping up
In this post I walked you through the integration processes available in the integration sandbox. Then I explained how to implement them in n8n. First I built a flow that handled getting, transforming and sending new shipments. Then a flow that handles incoming events. All while explaining why and how I use each node along the way.
If you followed along, we've covered the basics of:
- Authentication
- Scheduling / batch processing
- Receiving and sending messages via APIs/webhooks
- Data transformation and mapping
- Conditional routing
- Error handling
What's next?
In the next weeks I'm going to test the sandbox with Azure Logic Apps. I also read that n8n is going to release a new version soon. So I might revisit this article in a little while!
What do you think of this kind of content? I'd love to hear your thoughts, experiences, or even just a quick hello!